

Modern web applications often need to support multiple organizations or user groups within a single system. Multi-tenancy makes this possible by allowing different tenants to share the same application and database while keeping their data isolated. This approach improves scalability, reduces infrastructure overhead, and simplifies deployment and maintenance.
In one of my projects, we had a requirement to implement multi-tenancy, and I achieved this using the ActsAsTenant gem. This blog will walk you through different multi-tenancy strategies, their benefits, and how I implemented it in Rails.
Understanding Multi-Tenancy
What is Multi-Tenancy?
Multi-tenancy is an architecture where a single instance of software serves multiple customers (tenants). Each tenant’s data is isolated from others, even though they share the same application and database. Examples include:
- Shopify (each store is a tenant)
- Slack (each workspace is a tenant)
- GitHub (each organization is a tenant)
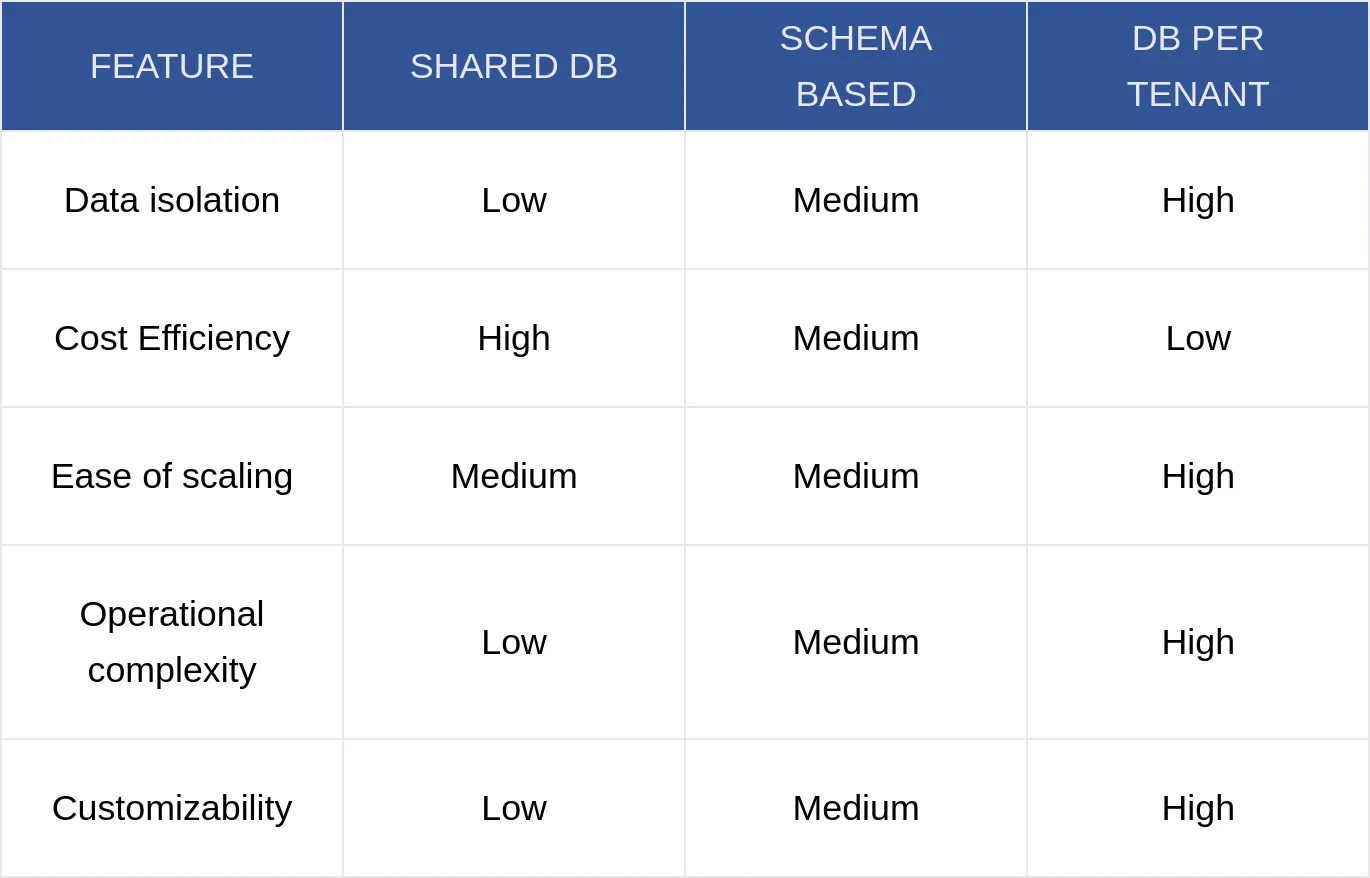
There are three primary approaches:
1. Shared Database with Scoped Data
- All tenants share a single database and tables.
- Tenant data is distinguished using a
tenant_idcolumn. - Pros: Simplicity, lower infrastructure cost.
- Cons: Requires strict security measures to prevent data leaks.
2. Schema-Based Multi-Tenancy
- Each tenant has a separate schema within the same database.
- Provides better data isolation than a shared database.
- Pros: Stronger isolation, easier backups.
- Cons: More complex migrations and schema maintenance.
3. Database per Tenant
- Each tenant gets its own database instance.
- Ideal for large-scale SaaS applications with strict compliance requirements.
- Pros: Maximum isolation and security.
- Cons: Complex management and higher infrastructure costs.
For this tutorial, we’ll implement shared database multi-tenancy using the ActsAsTenant gem.
Why Multi-Tenancy is Needed ?
1. Cost Efficiency
Instead of maintaining separate application instances for each client, multi-tenancy allows multiple clients to share the same application infrastructure, reducing hosting and maintenance costs.
2. Easier Updates and Maintenance
With a single application codebase serving multiple tenants, updates and bug fixes can be deployed once and applied to all tenants automatically. This simplifies version control and ensures that all customers are on the latest version without manual interventions.
3. Scalability
Multi-tenant applications can efficiently scale by optimizing shared resources rather than requiring separate resources per client. This allows better load balancing, efficient use of databases, and dynamic allocation of computing power.
4. Data Isolation and Security
Using proper scoping mechanisms (like ActsAsTenant), each tenant’s data is kept private and inaccessible to others. It ensures that sensitive business data remains confidential and prevents accidental access or modification of another tenant’s information.
5. Customization and Flexibility
Multi-tenancy allows tenants to have unique configurations, themes, and even feature toggles without affecting others. This makes it easier to provide personalized experiences while keeping maintenance minimal.
Deep Dive into Rails Multi-Tenancy with ActsAsTenant
The Concept:
Multitenancy with Subdomains (abc.opal.com / xyz.opal.com)
Each Subdomain = One Organization
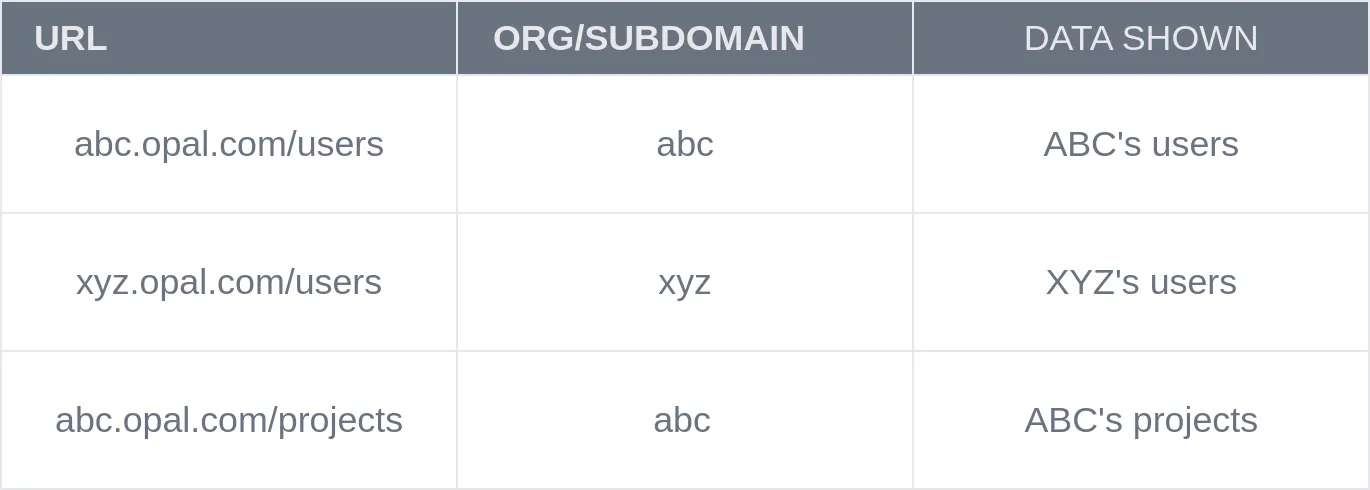
Let’s assume Opal is the product, and abc and xyz are organizations (tenants) using the product through their own custom subdomains.
In a subdomain-based multitenant Rails app, each subdomain represents a completely separate organization in your system.
So for example:
abc.opal.com→ belongs to the organization ABC Corpxyz.opal.com→ belongs to the organization XYZ Pvt Ltd
Here, abc and xyz are two entirely different organizations, and each one has its own users, data, projects, etc., isolated from the other.
Every request uses the subdomain to identify the correct tenant and scope all actions and data accordingly.
1. Add the Gem
# Gemfile
gem 'acts_as_tenant'

bundle install
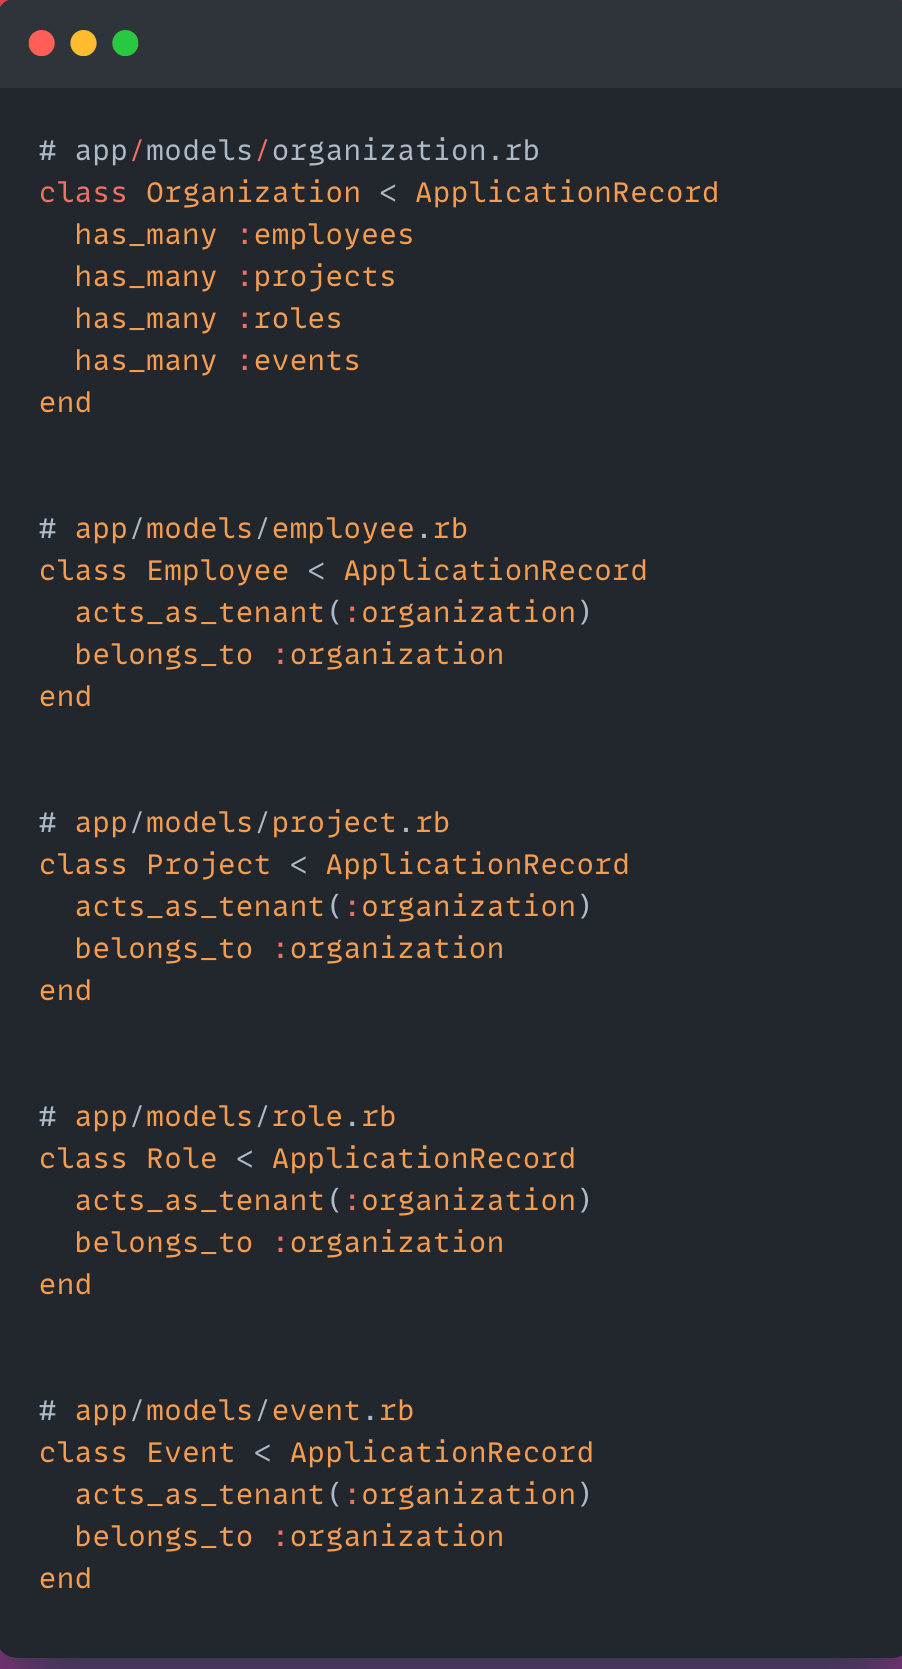
2. Generate Organization Model
This model represents your tenant:
rails g model Organization name:string subdomain:string:uniq
3. Generate Other Models
Each of these belongs to an organization:
rails g model Employee name:string email:string organization:references
rails g model Project title:string description:text organization:references
rails g model Role title:string organization:references
rails g model Event name:string date:datetime organization:references

Run migrations:

rails db:migrate
4. Define Model Associations with acts_as_tenant
5. Subdomain-based Tenant Switching
In ApplicationController, detect and set the current tenant.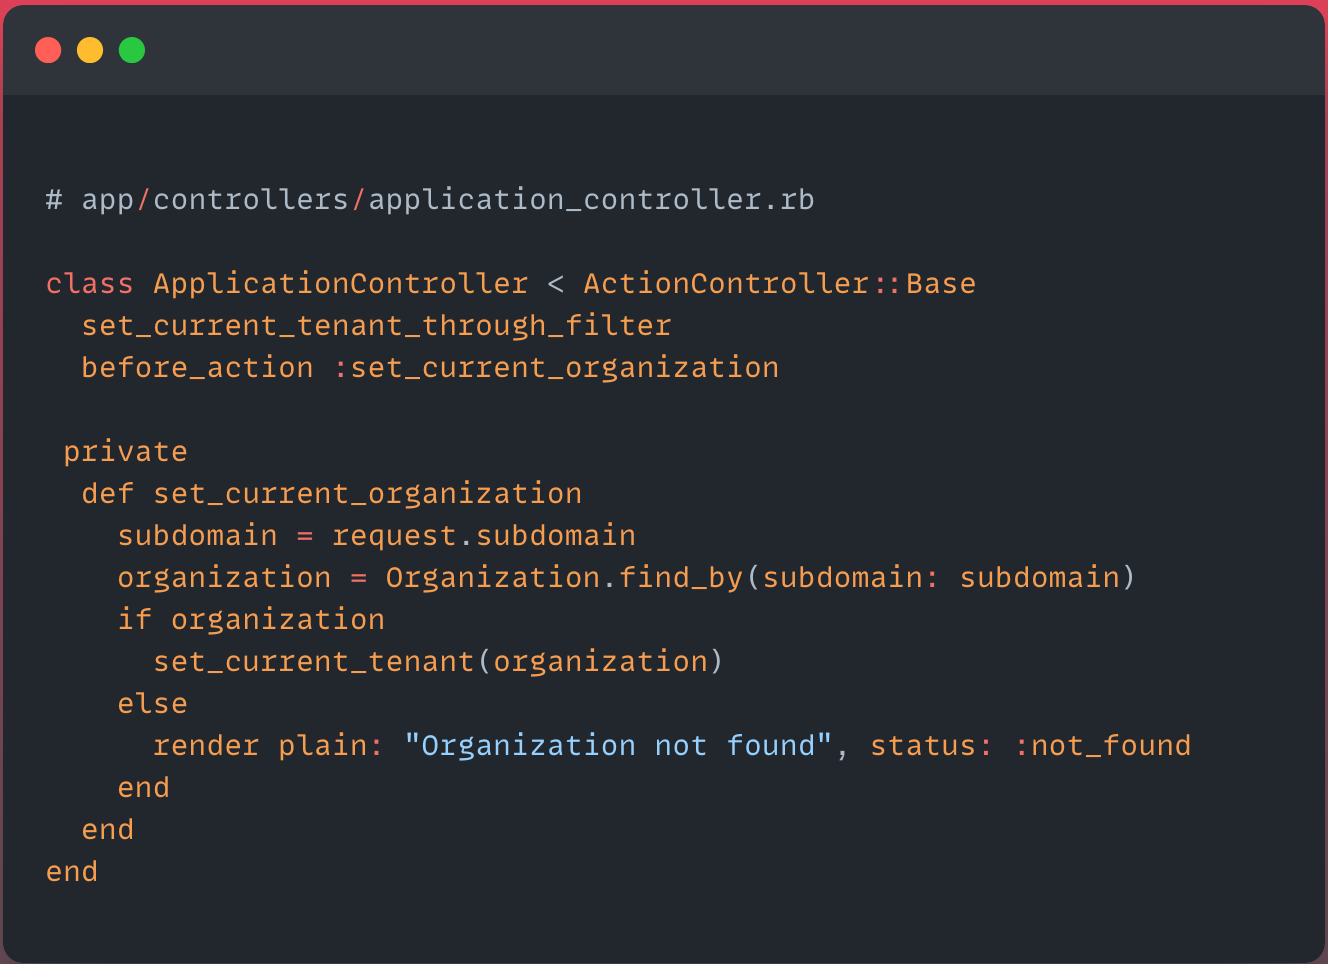
During development, use something like
abc.lvh.me:3000,xyz.lvh.me:3000to simulate subdomains locally.
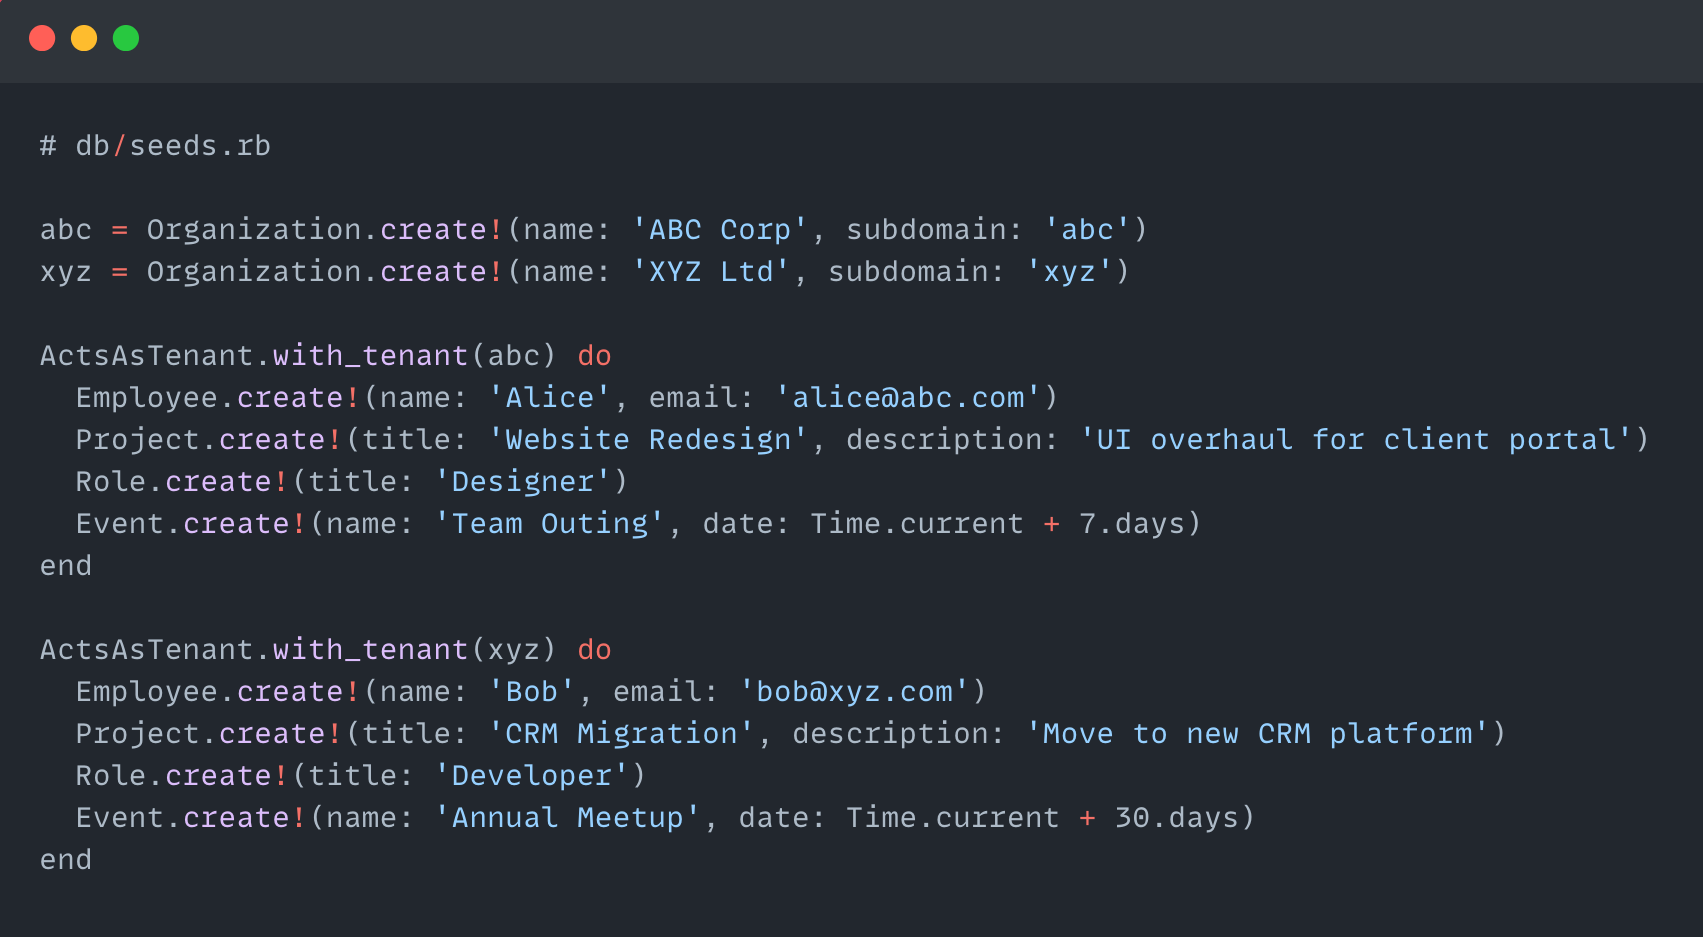
6. Sample Seed File
7. Scoped Queries (Automatic!)
Once acts_as_tenant is set up, you don’t need to manually scope queries:
# Automatically scoped to current tenant

Employee.all # => Only employees of abc or xyz depending on subdomain
You can manually simulate acts_as_tenant behavior in the Rails console to test scoping for different tenants.
Example: Using ActsAsTenant in Rails Console
Step 1: Fetch Organization
abc = Organization.find_by(subdomain: 'abc')
xyz = Organization.find_by(subdomain: 'xyz')
Step 2: Set Tenant Context
You can use ActsAsTenant.with_tenant(organization) to simulate scoped operations.
ActsAsTenant.with_tenant(abc) do
  # All these are scoped to abc
  Employee.create!(name: "Aarav", email: "aarav@abc.com")
  Project.create!(title: "HR Portal", description: "Internal HR system")
  puts Employee.all.pluck(:name) # Should only show abc's employees
end

ActsAsTenant.with_tenant(xyz) do
  Employee.create!(name: "Zara", email: "zara@xyz.com")
  puts Employee.all.pluck(:name) # Should only show xyz's employees
end
Step 3: Verify Scoping
In the Rails console, you can manually set the current tenant using:
ActsAsTenant.current_tenant = Organization.first
Here’s a complete usage guide with examples:
Set Current Tenant in Rails Console
Step 1: Load an Organization
org = Organization.first
# or
org = Organization.find_by(subdomain: 'abc')
Step 2: Set it as the Current Tenant
ActsAsTenant.current_tenant = org
Now, any model that uses acts_as_tenant(:organization) will automatically scope to this tenant.
Example: Create & Fetch Data for Tenant
# Set tenant
ActsAsTenant.current_tenant = Organization.find_by(subdomain: 'abc')

# Create data scoped to 'abc'
Employee.create!(name: "Ananya", email: "ananya@abc.com")
Project.create!(title: "Mobile App", description: "Build customer-facing app")

# Fetch scoped data (automatically scoped to current tenant)
Employee.all
Project.all
Try this without the tenant block:
Employee.all
If you want to temporarily disable tenant scoping to see all data:
ActsAsTenant.current_tenant = nil
Employee.unscoped.all
Reset Current Tenant (If Needed)
You can manually set or clear the tenant:
ActsAsTenant.current_tenant = abc
Employee.all # Scoped to abc
ActsAsTenant.current_tenant = nil
Running the Multitenant Rails App
Start the Rails Server
rails s -p 3000
Accessing Different Organizations via Subdomains
1. Recommended (No Setup Needed): Use lvh.me
lvh.me resolves to 127.0.0.1 and supports wildcard subdomains automatically.
You can visit:
No need to edit /etc/hosts or configure anything else.
2. Alternative: Manually Add to /etc/hosts (If using localhost)
Edit your /etc/hosts (Linux/macOS) or C:\Windows\System32\drivers\etc\hosts (Windows):
127.0.0.1 abc.localhost
127.0.0.1 xyz.localhost
Then, visit:
This method works, but
lvh.meis easier and portable across environments.
Verifying Isolation
Each subdomain request is scoped to its own Organization:
- Visiting
abc.lvh.me:3000/employeeswill show only ABC’s employees. - Visiting
xyz.lvh.me:3000/employeeswill show only XYZ’s employees.
Behind the scenes, this is handled by:
# app/controllers/application_controller.rb
def set_current_organization
  subdomain = request.subdomain
  organization = Organization.find_by(subdomain: subdomain)
  set_current_tenant(organization)
end
Best Practices for Multi-Tenant Applications
1. Tenant-Specific Authentication
- Use Devise with scoped authentication per tenant.
- Consider adding Single Sign-On (SSO) support.
2. Billing & Subscription Management
- Integrate Stripe for subscription-based billing.
- Track plan limits and enforce restrictions per tenant.
3. Performance Optimization
- Use connection pooling to manage database connections.
- Implement caching to reduce database load.
4. Security Considerations
- Prevent SQL injection and unauthorized tenant access.
- Regularly audit tenant data separation.
Final Conclusion
You’ve successfully implemented subdomain-based multitenancy in your Rails application using the acts_as_tenant gem. Each organization—like abc.opal.com or xyz.opal.com—now has isolated access to its own employees, projects, roles, and events, all within a single database.
Key Highlights:
Organizationacts as the tenant model, identified via subdomain.acts_as_tenant(:organization)automatically scopes data across models.- Subdomains are parsed in
ApplicationControllerto set the current tenant. - Console testing is easy using:
ActsAsTenant.current_tenant = Organization.find_by(subdomain: 'abc')
- For local development, use
abc.lvh.me:3000or configure/etc/hosts.
This setup provides a clean, scalable foundation to build multi-org platforms with strong data isolation and minimal overhead.
