

Two-way SMS communication has become a must-have feature for modern applications, enabling real-time, interactive messaging experiences. Whether it’s for sending OTPs, notifications, or enabling customer support, two-way SMS allows businesses to engage with users directly and effectively. Twilio, with its powerful and easy-to-use API, simplifies the process of integrating SMS functionality into your applications.
In my last project, implementing two-way SMS was a crucial requirement. However, I faced several challenges due to a lack of proper resources and scattered documentation. From handling incoming messages to managing responses dynamically, there were many roadblocks that required creative solutions.
In this blog, I’ll share a step-by-step guide on implementing two-way SMS in a Ruby on Rails application using Twilio. Along with practical code examples, I’ll also cover common challenges developers face and how to overcome them — so you don’t have to go through the same struggles I did!
One-Way SMS (Outbound Messaging)
This is used when businesses only need to send notifications, alerts, or marketing messages without expecting a response.
- Examples:
- Order Updates: “Your order #12345 has been shipped!”
- Appointment Reminders: “Hi Raj, your appointment with Dr. Sharma is scheduled for tomorrow at 10 AM.”
- Promotional Messages: “Limited-time offer! Get 20% off your next purchase. Use code: SAVE20.”
Setting Up Twilio SMS Service in Your Application
To integrate Twilio into your application, follow these steps:
Step 1: Set Up Twilio Account
- Sign up for a free Twilio account.
- Get a Twilio phone number that supports SMS.
- Note down your Account SID, Auth Token, and Twilio Phone Number from the Twilio console.
Step 2: Install the Twilio Gem (for Ruby on Rails)
Add Twilio to your Gemfile and install it:
1. Configure Twilio Credentials
In config/initializers/twilio.rb, store your Twilio credentials securely:

Twilio.configure do |config|
  config.account_sid = ENV['TWILIO_ACCOUNT_SID']
  config.auth_token = ENV['TWILIO_AUTH_TOKEN']
  config.twilio_phone_number = ENV['TWILIO_PHONE_NUMBER]
end

-------------------------------------------------------------------------------------
2. Create a Twilio SMS Service
# app/services/twilio_sms_service.rb

class TwilioSmsService
  def initialize(to, message)
    @to = to
    @message = message
    @from = ENV['TWILIO_PHONE_NUMBER'] # Twilio's registered phone number
  end

  def send_sms
    client = Twilio::REST::Client.new
    client.messages.create(
      from: @from,
      to: @to,
      body: @message
    )
  rescue Twilio::REST::TwilioError => e
    Rails.logger.error "Twilio Error: #{e.message}"
    false
  end
end
# app/controllers/sms_controller.rb
class SmsController < ApplicationController
  def send_sms
    phone_number = params[:phone_number] # User's phone number
    message = params[:message] || "Hello from our app!"

    sms_service = TwilioSmsService.new(phone_number, message)
    if sms_service.send_sms
      render json: { status: "SMS sent successfully" }, status: :ok
    else
      render json: { error: "Failed to send SMS" }, status: :unprocessable_entity
    end
  end
end
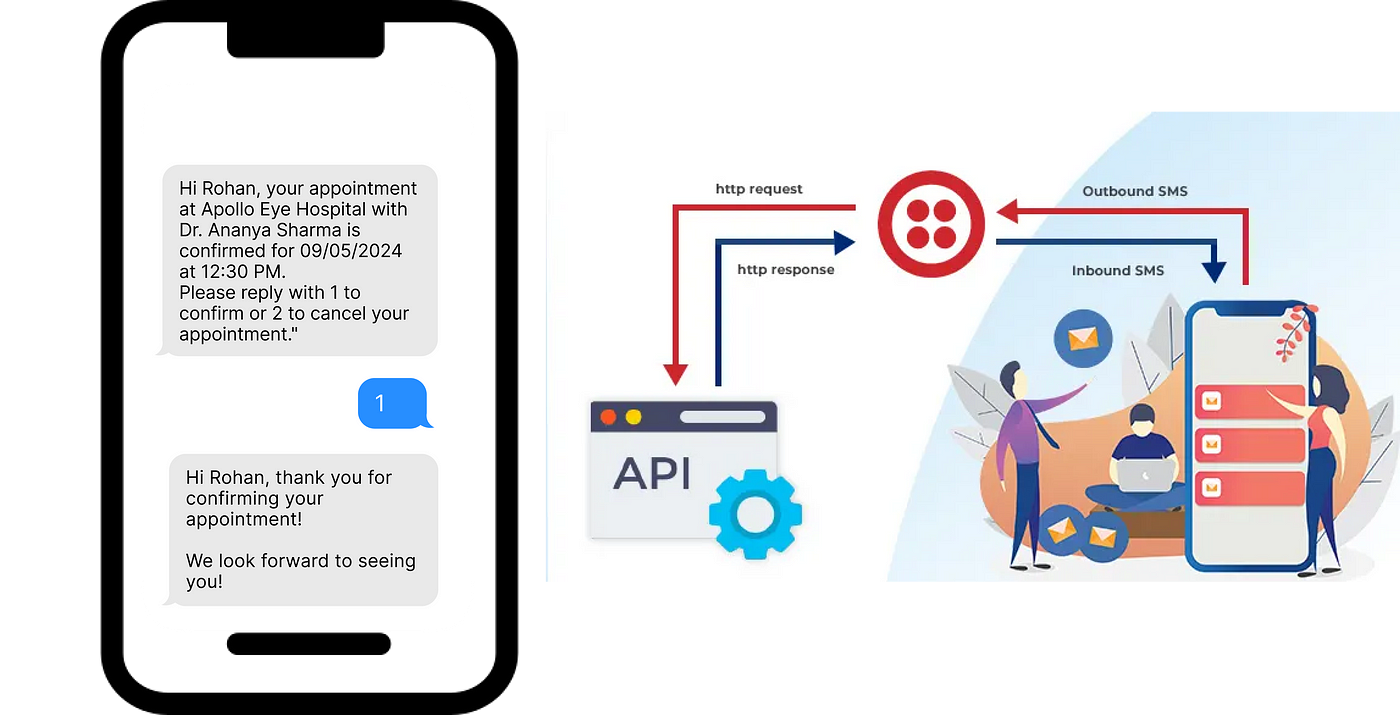
Two-Way SMS (Interactive Messaging)
Twilio 2-Way SMS allows businesses to send messages and receive responses dynamically, enabling real-time customer engagement.
- Examples:
- Appointment Confirmations: “Reply 1 to confirm, 2 to reschedule.”
- Customer Support: “Reply with your issue, and our agent will assist you.”
- Event Attendance: “Will you be attending the seminar? Reply YES or NO.”
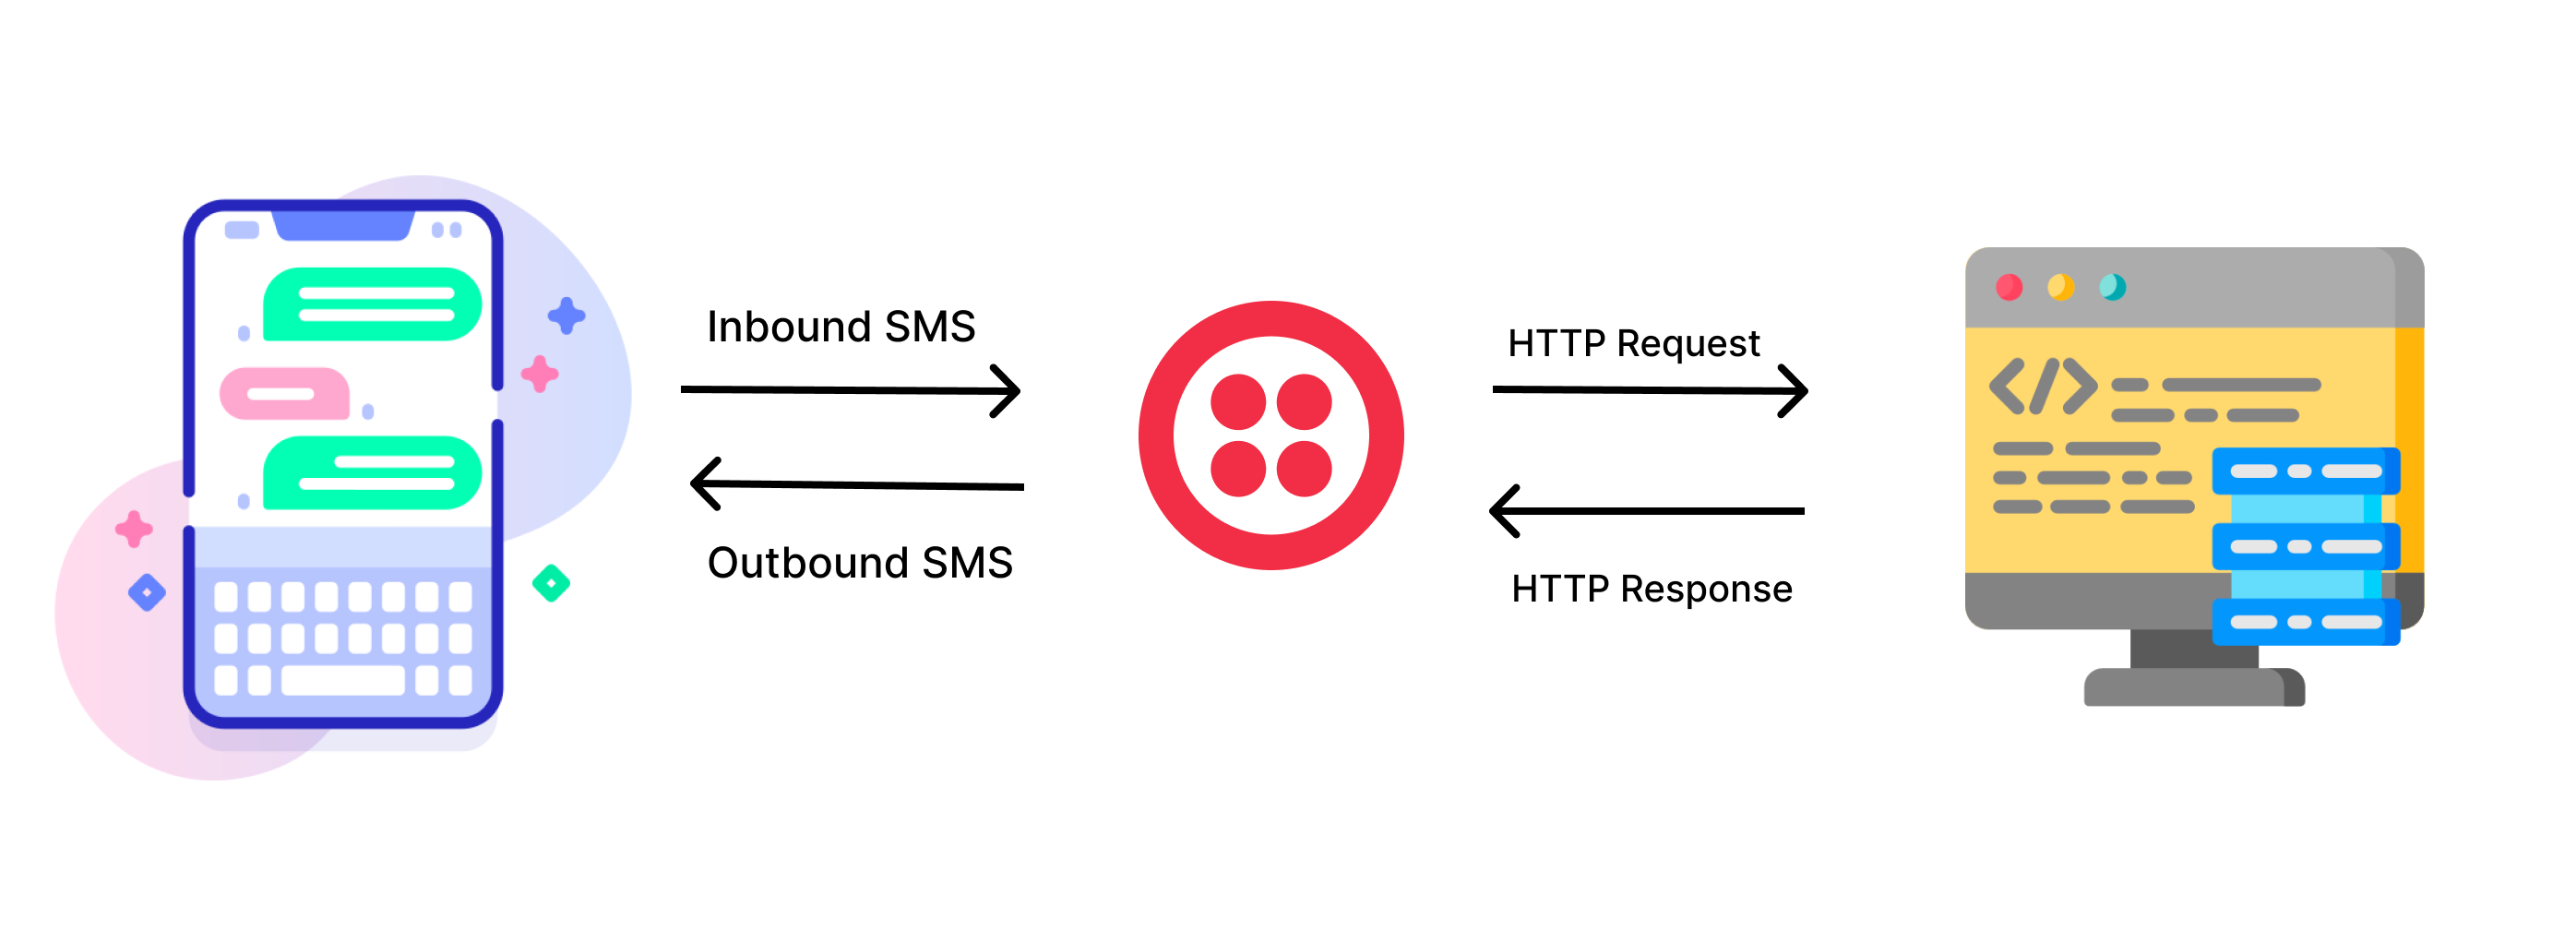
How 2-Way SMS Works ?
1. User Receives an SMS About a Special Event — A business sends an SMS to a user about an upcoming event, a survey, or a special offer.
2. User Responds with Input — If the business needs user input (e.g., confirmation, feedback, or other responses), the user replies to the SMS with a specific keyword or message.
3. Twilio Captures the Input — Twilio processes the message and forwards it to your system.
4. Your System Handles the Data — Based on the user’s response, your application performs necessary database operations, such as updating confirmation status, storing feedback, or confirming a booking.
5.Automated or Manual Response is Sent — The system may send an automated response (e.g., “Thank you for confirming your attendance!”) or forward the message to a support agent for follow-up.
Step 1: Implement SMS Sending
Here’s a simplified service class to send SMS using Twilio in a Ruby on Rails application:
# frozen_string_literal: true

require 'twilio-ruby'

class TwilioSmsService
  def initialize
    @client = Twilio::REST::Client.new(ENV['TWILIO_ACCOUNT_SID'], ENV['TWILIO_AUTH_TOKEN'])
  end

  def send_sms(to, body)
    @client.messages.create(
      from: ENV['TWILIO_PHONE_NUMBER'],
      to: to,
      body: body
    )
    { success: true }
  rescue Twilio::REST::TwilioError => e
    { success: false, error: e.message }
  end
end
# How to Use It
#  Call the send_sms method wherever you need to send an SMS:

sms_service = TwilioSmsService.new
response = sms_service.send_sms('+919876543210', 'Hello! Your appointment is scheduled for tomorrow at 10 AM.')
Step 2: Set Up Webhook to Receive SMS Responses
A webhook is an endpoint that Twilio calls when an SMS is received. To process incoming messages, follow these steps:
Step 2.1: Create a Webhook Endpoint
Your webhook will listen for incoming messages and respond accordingly. In a Ruby on Rails application, you can set up a controller to handle Twilio’s webhook requests.
Now, define the webhook method inside controller
class SmsController < ApplicationController
  skip_before_action :verify_authenticity_token  # Required for handling Twilio's POST requests

  def receive_sms
    sender_number = params['From']
    message_body = params['Body'].strip.downcase

    response_message =
      case message_body
      when '1'
        "Thank you! Your appointment has been confirmed."
        # Perform your database related changes and actions.
      when '2'
        "Your appointment has been canceled. Let us know if you’d like to reschedule."
        # Perform your database related changes and actions.
      else
        "Sorry, we didn't understand that. Please reply with 1 to confirm or 2 to cancel."
      end

    twiml = Twilio::TwiML::MessagingResponse.new do |r|
      r.message(body: response_message)
    end

    render xml: twiml.to_s
  end
end
Step 2.2: Define Routes for Webhook
post '/sms', to: 'sms#receive_sms'
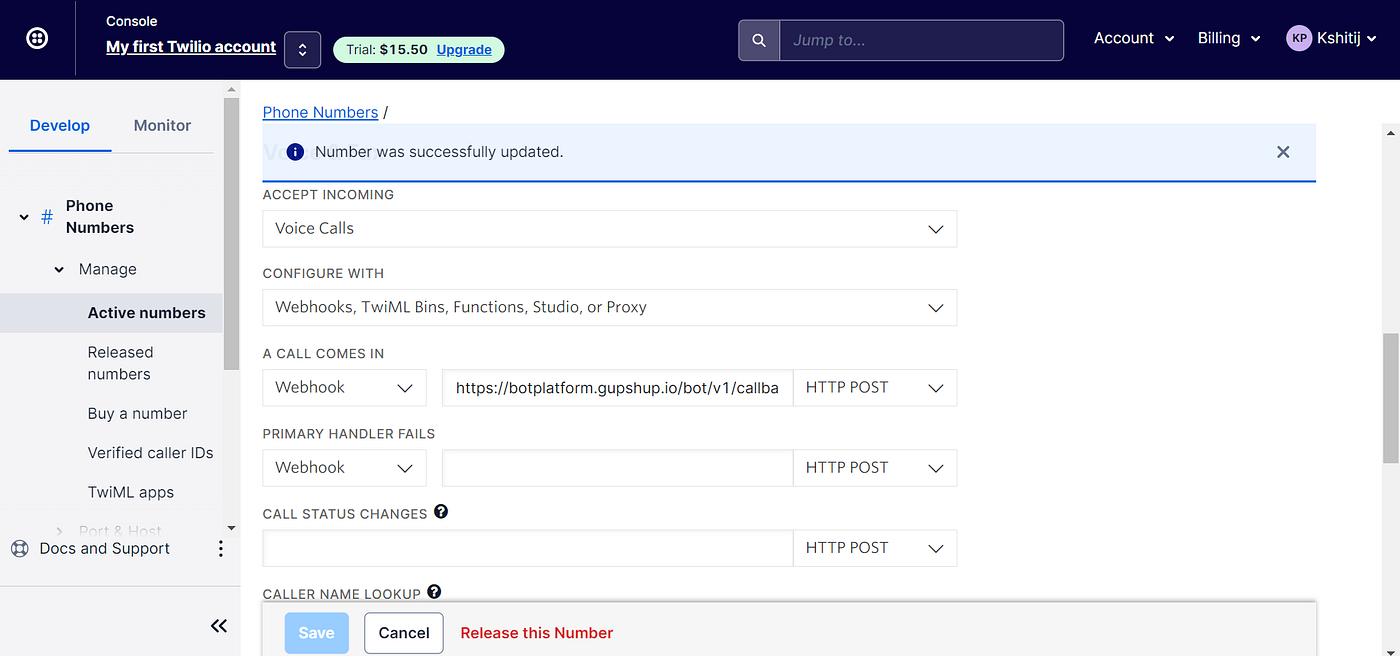
Step 2.3: Link Your Webhook in Twilio
1️⃣ Log in to Twilio Console
- Go to Twilio Console.
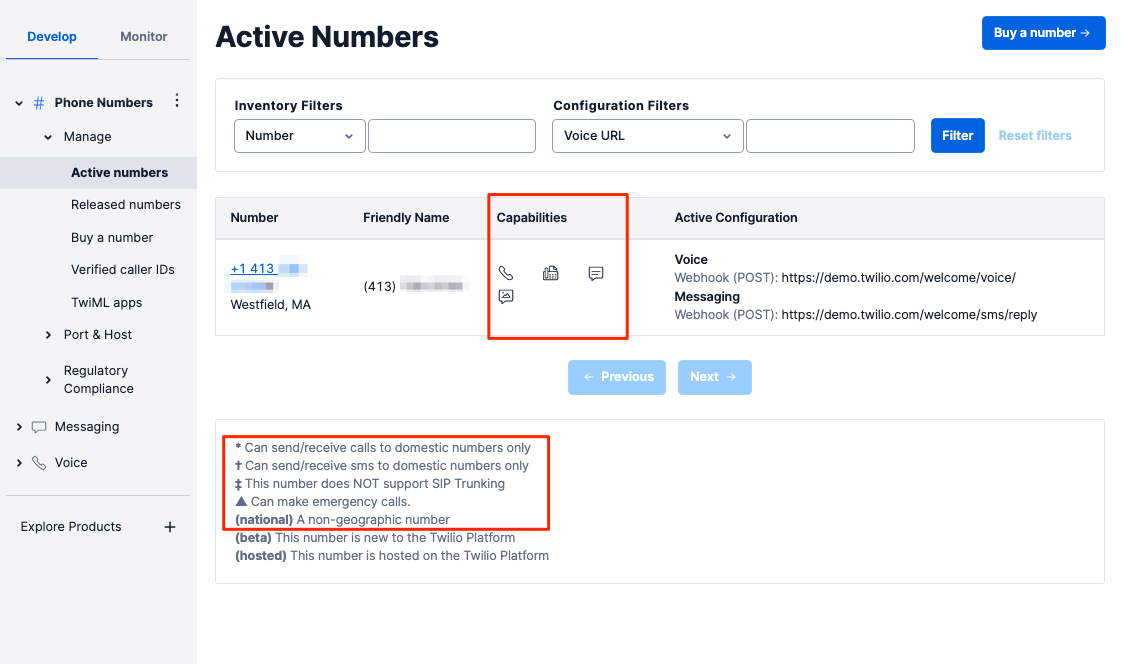
2️⃣ Navigate to Your Phone Number
- In the left sidebar, click on Phone Numbers → Manage Numbers.
- Click on the Twilio phone number you are using for SMS.
3️⃣ Configure Messaging Webhook
- Scroll down to the Messaging section.
- Find the option “A Message Comes In”.
- Select Webhook from the dropdown.
- Enter your publicly accessible webhook URL:
Example:

https://your-app-name.com/sms/receive
- Select HTTP POST as the method.
4️⃣ Save the Configuration
- Click Save at the bottom of the page.
5️⃣ Test the Webhook
- Send an SMS to your Twilio phone number from any mobile device.
- Twilio should forward the message to your Rails webhook.
- Check your Rails server logs to verify the incoming request.
Step 3: Verify Twilio Webhook is Working
To confirm everything is set up correctly:
- Send a test SMS to your Twilio number (e.g., “1” to confirm).
- Check your Rails logs to see if the webhook receives the request:
- Twilio should respond with the expected message (e.g., “Thank you! Your appointment is confirmed.”).
Next Step
Once Twilio is correctly configured, proceed with testing and refining your business logic. 🚀
