
This post is not related to production deployment automation. This post is our voice of experience (read as: major issues caused due by “minor” missing server configurations) and how we resolved them.
These are changes that would help you in case you are dealing with
- Upgrading your server stack that uses HAProxy and SSL (We were using EngineYard)!
- Nginx configurations to prevent spoofing (and a rant on Cloudflare Always Online crappy product).
Upgrading your server stack
For the past few years, we had been using m1.large AWS EC2 servers from EngineYard. When AWS introduced better pricing for the newer servers, we migrated to the new servers. We setup the new server and migrated our old IP address to the new server. Obviously, there was no need to make any changes in the DNS. So, we thought all was well until our customer started complaining!
The portal administrator required to know the remote IP address as an additional level of logging and security and all of a sudden (from the date we migrated to the new servers), the remote IP was always the private IP address of the EC2 instance!
After contacting EY support, we had a few rounds of barking up the wrong tree. The following stunts failed but I am mentioning it here so that you know you’re in going in the wrong direction!
Stunt 1: CNAME, ELB and HAProxy games
Initially it was assumed that HAProxy handles remote IPs incorrectly when SSL is involved and we we need to use an Elastic Load Balancer or setup stunnel! Or disable haproxy (not recommended though). We followed instructions mentioned at and setup and “App terminated” ELB. Then we added the CNAME in our DNS.
No luck!
Stunt 2: Route53 hiccup
Since we had initially setup an A record with the Elastic IP, it was deemed that the ELB name entry was being by-passed and hence things were not working. So, it was recommended to move the domain to Route53 instead of our current Registrar.
Now this was suddenly a big issue with our customer and just when there was enough shit hitting the roof, EY support had another idea that worked! There was no need to change the A record or add the CNAME entry.
Here is a concise steps of changes that are required:
- Add an ELB (Elastic Load Balancer)
- Set the SSL terminated option to “ELB terminated” (not App Server terminated!)
- Copy the same SSL certificate that’s on the app server to the ELB.
- Change the nginx configuration to listen on port 81 instead of 80 (http) and 444 instead of 443 (https)
Now, HTTP(80) and HTTPS(443) requests are handled by the ELB (since our app is listening on 81 and 444). It then forwards the request with the correct “remote IP” to our application server and things are finally back to normal. Remember that the SSL certificate is for one domain only. Since we had it for http://www.ourdomain.com, we had to setup nginx 301 permanent redirects to the www domain.
Lessons learnt – when upgrading hardware resources, certain security policies change and can have adverse impact
Prevent Spoofing with proper nginx configuration
It so happened that our customer complained about Google Search results going wrong! As the owner of a site called fundamentor.com, when he google’d for it, very surprisingly, another site came up too!
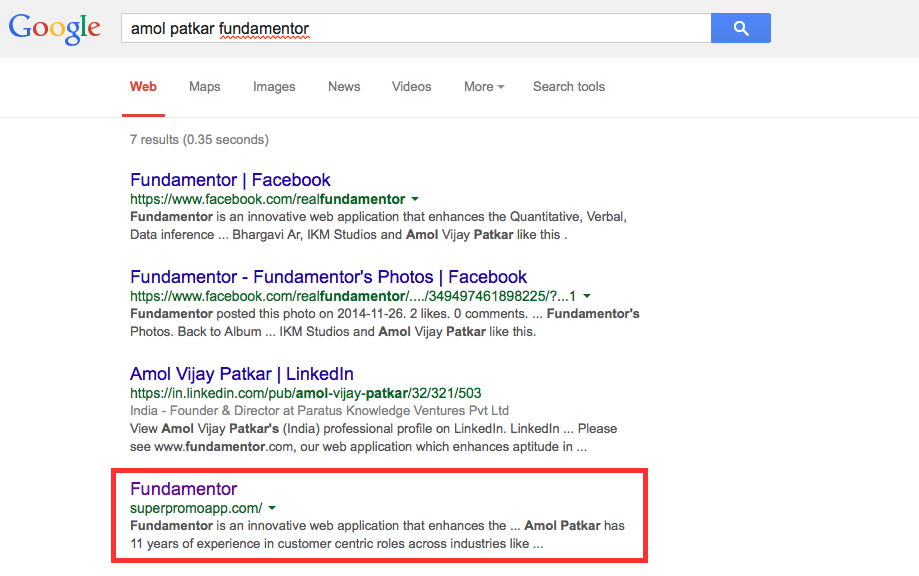
When we actually clicked on that link – we were very surprised to see exactly our site available there. Thinking that there may be someone who has copied our HTML and updated it, I tried to login and I was able to login too!. Now we were worried and shit hit the roof. As you can see in the image below, the URL is for superpromoapp.com but its our web-portal that is displayed and fully functional. Had our servers been hacked? Had our source code been compromised?

When we checked out access.log file in nginx and found (to our relief) that we had been getting requests to http://superpromoapp.com and they were being served! On further investigation, we realized that our nginx configuration has only one server block. It’s mentioned in the documentation of nginx listen directive that
If none of the directives have the default_server parameter then the first server with the address:port pair will be the default server for this pair.
That’s exactly what was happening. So, superpromoapp.com has a malicious HTTP server that was rewriting the URL to hit the real server (fundamentor.com) and acting as a pass-through. Luckily we had found this early on otherwise all data including sensitive information would pass through this middle-man. They even had their own robot.txt configured to ensure good responses to crawlers and get a better ranking! (I still don’t know what they would get out of a better ranking) but to prevent this unwanted access, we then added the following to our nginx configuration.
server {
  listen 80;
  server_name fundamentor.com www.fundamentor.com;
  ...
}

# This was added to prevent any other domain accessing our site.
server {
  listen 80;
  server _ default_server;
  return 520;
}
Now, when we tried to open http://superpromoapp.com we realized that the spoofed site had cached all the content via “CloudFlare Always On” technology. Since this product acts as a reverse proxy, you can get content from virtually any site if you configure your DNS. When we reported abuse, they said that this was a hosting issue and diverted our query. Probably unrelated but worth a read about CloudFlare crappy support ToS!

When a day later, the cache was invalidated, the requests to http://superpromoapp.com were rejected by nginx with Error code 520 (Origin Error) and we finally resolved the problem ourselves!

Lesson learnt – Among other directives, don’t forget to add an nginx default_server block.
Hope these minor server configurations help you ensure that hardware upgrades or nginx server configurations allow you to have a better experience than we faced!
