
Single Sign-on is an authentication process followed by many organizations for allowing users to access multiple applications with single sign in.
Advantages of using Single Sign-on are:
- Use single credentials which are defined on centralized server.
- One time login to get access to multiple applications.
- Single place for user management like – add new user or account, disable account, lock or unlock account and etc.
There are different protocols used to support single-sign on. Commonly used ones are:
- Oauth 2.0 – was primarily intended for delegated authorization, where an app is authorized to access resources, such as Google contact list. It doesn’t deal with authentication.
- OpenId Connect – It is built on top of OAuth 2.0, which supports authentication and thus direct SSO. But it is typically used for consumer facing mobile/web applications.
- SAML 2.0 – It is same as OpenId connect, but commonly used for enterprise application.
In this blog, we are going to use SAML 2.0 protocol for SSO authentication. Before diving into code, let’s understand few terminologies used in SSO and it’s flow.
SSO Terminologies
- SAML – Secure Assertion Markup Language(SAML) is a digitally signed XML document which includes information about user, source and destination systems which are intended to use this XML document and other information to validate the XML signature.
- Identity Provider (IDP) – Is a system who can identify the user and issue the signed SAML document. e.g: Okta, OneLogin etc.
- Service provider (SP) – Is a system who receives the SAML XML. e.g: Our spring boot application
- Metadata – Is an XML document which holds information about the identity provider and service provider. Metadata XML is issued by identity provider when a service provider registers the application. Please note that metadata XML is an application specific file. Metadata holds an entityID attribute which is unique to an application.
- Success callback URL – This is service provider success URL. Identity provider will use this URL to post the SAML response
- SP initiated SSO – In this process, a user will request to the service provider to access the protected pages. The service provider will initiate the request to the identity provider to validate the user. Upon getting request the identity provider will prompt to enter the credentials if not logged in. Once login is success the identity provider will post the SAML response to the service provider.
- IDP initiated SSO – In this process, a user will login into the identity provider website and tries to access the service provider resources remotely. In this case, idp will initiate the request to service provider and post the SAML response to allow access to resources.
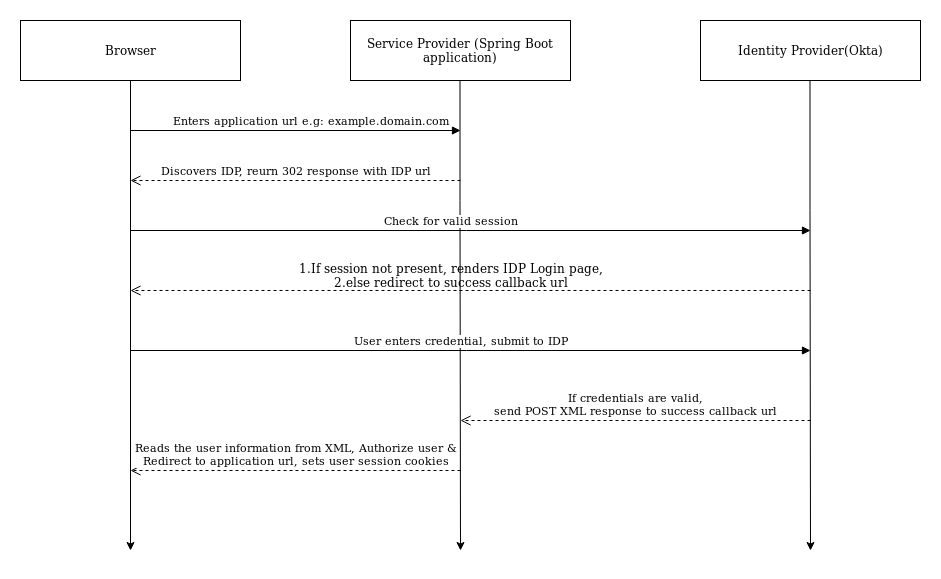
SSO flow Diagram(SP Initiated SSO)
To integrate SSO flow in our spring boot application, we need to do certain configurations at Identity provider and Service Provider. We will see these configurations one by one.
IDP Configuration
Spring SAML supports various identity providers(IDP) like ADFS, Okta, OneLogin and others. We are going to use Okta IDP to demo the SAML based SSO. For that, we will create one okta developer account using following steps.
Okta registration
- We will use Okta developer portal to sign-up for a free trial.
- Upon registration follow steps given in the link to create SAML application with general settings.
- After adding general information, go to “SAML Configuration” tab and enter application details as mentioned below:
- Single sign-on URL: https://localhost:8443/saml/SSO
- Audience URL: https://localhost:8443/saml/metadata
Please note, my application is running on https://localhost:8443. hence the paths are, as mentioned above. Replace URLs as per your application url and port. But, we need to run our application on https to make it work locally as we need to communicate with Okta which is running on https, to run our application on https, we will add self signed certificate.

4. After application creation, on next page, it will display saml metadata URL to be used in the service provider. Refer “Identity Provider metadata” link, shown in the below screenshot. Copy that URL.

Service Provider Configurations
- To setup service provider, we need to run the spring boot application. If you already have application running, you will need to add two dependencies in your
pom.xmlas mentioned below:
....

<dependency>
  <groupId>org.springframework.security.extensions</groupId>
  <artifactId>spring-security-saml2-core</artifactId>
  <version>1.0.9.RELEASE</version>
</dependency>

<dependency>
   <groupId>org.springframework.security.extensions</groupId>
   <artifactId>spring-security-saml-dsl</artifactId>
   <version>1.0.0.M3</version>
</dependency>

....
spring-security-saml2-core – saml2 core is an extension of Spring security to support basic SAML processing for single sign-on.
spring-security-saml-dsl-core – saml dsl is used along with saml 2 core which holds the basic configuration for request mapping, filter and authentication provider configuration.
spring-security-saml-dsl-core contains below request mapping details configured by default.
- /saml/SSO – This is success callback URL and IDP uses this request mapping to post the SAML.
- /saml/metadata – This mapping is used to display and read the metadata file.
- /saml/login – Responsible to generate the login request and redirect to IDP page for login.
2. As mentioned above we would need to run our application on https. To run our application on https, we will add self-signed certificate. We will use java keytool to generate self-signed certificates and place the keystore.jks file in the resource folder.
keytool -genkey -keyalg RSA -alias okta -keystore keystore.jks -storepass okta123 -validity 360 -keysize 2048
3. Now, we want to protect our application routes using SSO authentication, for that we need to add below securityConfig.java file in the codebase. To know more about Spring Security, please refer this link.
In short, what the below code does is, it prevents unauthorised users from accessing protected routes. And if they try to access it directly, it will redirect them to Okta login page.
@EnableWebSecurity
@Configuration
public class SamlSecurityConfig extends WebSecurityConfigurerAdapter {

  @Value("${okta.metadata-path}")
  private String metadataPath;

  @Value("${okta.sp.host}")
  private String spHost;

  @Value("${server.ssl.key-store}")
  private String keyStoreFile;

  @Value("${server.ssl.key-store-password}")
  private String keyStorePassword;

  @Value("${server.ssl.key-alias}")
  private String keyStoreAlias;

  @Autowired
  private SamlRequestFilter samlRequestFilter;

  @Autowired
  private SAMLUserService samlUserService;

  @Override
  protected void configure(final HttpSecurity http) throws Exception {
    http
      .csrf()
      .and()
      .authorizeRequests()
        .antMatchers("/saml/**").permitAll()
            .antMatchers("/authenticate")
            .authenticated()
        .and()
      .apply(saml())
            .userDetailsService(samlUserService)
        .serviceProvider()
          .protocol("https")
          .hostname(spHost)
          .basePath("/")
          .keyStore()
            .storeFilePath(keyStoreFile)
            .keyPassword(keyStorePassword)
            .keyname(keyStoreAlias)
          .and()
        .and()
        .identityProvider()
          .metadataFilePath(metadataPath);
  }
}
saml() – returns saml configurations which contain the SAML 2.0 request mapping, filter and authentication provider details. You can notice these filters, while running application.
When an application gets the SAML response, first, it will validate the SAML XML. Validation includes source and destination ids, session time, signature and so on. If the response XML is valid then SAML DSL will call samlUserService() method. we can build our own user service to convert the XML into custom user model as below
 @Override
 public User loadUserBySAML(SAMLCredential credential) {

        String email = credential.getNameID().getValue();

        // check if user exists & include more details of user from database
        User user = users.findByEmailAndStatus(email, "active");

        if (user == null) {
            logger.error(String.format("User doesn't exist with email: %s", email));
            throw new UsernameNotFoundException(String.format("User not found with email: %s", email));
        }

        return user;
}
serviceProvider() – Usually when a user successfully logged in, IDP will post a SAML response to /saml/SSO of service provider. Here service provider will validate the XML. As part of the validation, it looks for entity id, destination, audience and other details.
For example, In our IDP configuration section we mentioned https://localhost:8443 domain for all sections. Hence we mentioned localhost, as part of the SAML response the XML document will contain https://localhost:8443/saml/SSO as the destination. When a request is posted to the localhost instance, it will check for destination attribute with the local instance domain. If both (SAML destination attribute and local instance name) are not matching request validation will fail.
After successful authentication from okta, it will redirect to basePath. In our case, basePath is root path.
identityProvider() – Provide the details of identity provider using metadataFilePath method which takes metaDataFilePath, which contains details of identity provider. metaDataPath is an XML file, which we got in the Service Provider configurations mentioned above.
Above example is fine when we are testing in local or with a single instance. But in production the situation is different. We will have multiple instances on multiple nodes with the load balancer. In IDP configuration we will give the load balancer domains instead of single node domain. In this case, the SAML validation will fail because the SAML response intended destination is loadbalancer domain.
spring-security-saml2-core contains two different SAML context providers to validate the SAML token. One is SAMLContextProviderImpl.java and another one is SAMLContextProviderLB.java. By default spring-security-saml-dsl-core uses SAMLContextProviderLB.java as a context provider. While validating SAML intended destination, SAMLContextProviderLB.java uses the configured domain instead of validating with the SAML processing node domain. For LB environment, update okta.sp.protocol and okta.sp.host details in application.yml with load balancer domains.
4. To work above securityConfig.java, we will need to add below configurations in the application.yml
server:
  port: 8443
  ssl:
    enabled: true
    key-alias: okta
    key-store: classpath:keystore.jks
    key-store-password: okta123
okta:
  metadata-path: ${OKTA_METADATA_PATH}
  sp:
    host: localhost:8443
5. Now we will be able to get logged in user details using getPrinciple() method provided by spring security in any controller action as below:
@RequestMapping("/")
public ResponseEntity<?> home(ExpiringUsernameAuthenticationToken userToken) {
    return new ResponseEntity<>(userToken.getPrincipal(), HttpStatus.OK);
}
That’s it!!.
We are done with all the configurations required to run our application and retrieved logged in user details. Now we can check our application at https://localhost:8443.
If you face any issues, you can find complete source code here.
Happy coding!

.and()
.and()
— Typo
Sorry, it needs two and