
In this post, we will learn how to use GCP (Google Cloud Platform’s) Pub/Sub service with the Spring Boot application. We will create two simple applications, sender and receiver. We will send a message to a sender application which will publish the message to a Topic and receiver application will receive the message by subscribing to that topic.
1. Introduction
GCP Pub/Sub is a fully-managed real-time messaging service that allows you to send and receive messages between independent applications. You can publish message on a topic, receiver applications subscribe for that topic’s subscription for receiving published messages. On message received receiver application acknowledges message and the message will be removed from message queue. If acknowledgment is not received, GCP will resend the message by the specified delay time. Hence, message delivery is guaranteed.
2. Why GCP PUB/SUB ?
Consider scenario where two microservices or applications needs to communicate with each other in order to complete a task. Which options come into your mind?
- HTTP Request ?
- GRPC ?
Yes, you can use HTTP request to communicate with another service and get your work done. But is this full proof reliable solution? I will say No. Since there are chances of request failure in HTTP, you will need to implement retry logic on your own. Also for exchanging very small amount of data, HTTP becomes very bulky due to request headers etc. Also while calling HTTP service you will need to provide authentication even though both the microservices belong to the same application.
So? you might be thinking we can use GRPC then. Again in case of GRPC, you will need to learn it’s syntax and methodologies. And you will have to write retry logic if message delivery failed.
Now let’s see how GCP Pub/Sub helps to overcome these problems.
- Provides retry mechanism
- Very lightweight and fast
- Minimum configuration.
- Fully managed by google, so no headache of maintenance.
GCP has it’s built in mechanism which will retry message sending until it is acknowledged. So message delivery is ensured without any packet loss. Since it deals with text data and no other overhead, data exchange is very fast and lightweight. This is very important when it comes to real time data processing, Since message queue is managed by Google, you don’t need to worry about your application failure. Since all messages are in gcp queue, your application receives them once application is up and running. So no chances of packet loss. GCP Pub/Sub is very easy to configure we will see in next sections how it is easy to configure. Since service is completely managed by Google itself, you don’t need to worry about any additional infrastructure maintenance.
Please visit GCP PUB/Sub Pricing for pricing details.
Now we have a basic idea of how GCP Pub/Sub is helpful in microservices communication, let’s move on to actual implementation in next sections.
3. Create GCP account and enable pub/sub api
In order to use GCP Pub/Sub features, we must have GCP account. Visit GCP website to create GCP account. Click on Get started for free. Follow the instructions for signup and finally our GCP account will be ready.
Now we will have to create a project first. Follow the instruction on create project screen and your project will be created.

After project creation, we will have to enable Pub/Sub API first, then only we can access pub/sub features. Go to the Big Data section and select Pub/Sub in the menu:

Click on Topics, Since we are using Pub/Sub for the first time, a message will be shown to enable the Pub/Sub API. Click on the enable API button.

Now, since API has been enabled we can create a topic. Go to the topics and create topic.

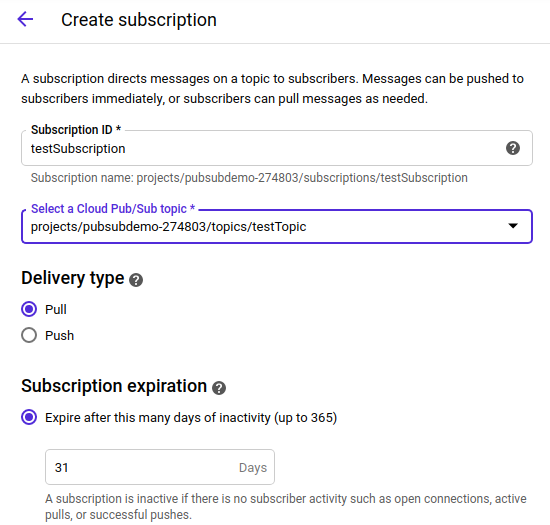
Now we will create subscription for the topic. From subscription menu click on create subscription.
Since we have created topic and it’s subscription let’s move forward and create sender and receiver app. To access this topic and subscription we need to generate service-account.json file from Google console, follow this link: generating service account file. Keep service-account.json downloaded on your system.
4. Create sender application
The sender application will have following components:
- Message Gateway which will write messages to the Spring Channel.
- ServiceActivator which will consume the messages in the Spring Channel and publish them to the GCP Topic
- Outbound Channel Adapter which will ensure that the messages are delivered to the GCP Topic.
For creating the sender application gcpPubSubDemo, we go to Spring Initialzr and select Java 11.
We need to add the dependencies spring-boot-starter-web and spring-cloud-gcp-starter-pubsub and spring-boot-starter-integration to our pom. The dependency spring-cloud-gcp-starter-pubsub will autoconfigure a PubSubTemplate for Google Cloud Pub/Sub.
<properties>
  <java.version>11</java.version>
  <spring-cloud.version>1.2.1.RELEASE</spring-cloud.version>
</properties>

...

<dependencyManagement>
  <dependencies>
    <dependency>
      <groupId>org.springframework.cloud</groupId>
      <artifactId>spring-cloud-gcp-dependencies</artifactId>
      <version>${spring-cloud.version}</version>
      <type>pom</type>
      <scope>import</scope>
    </dependency>
  </dependencies>
</dependencyManagement>

<dependency>
  <groupId>org.springframework.boot</groupId>
  <artifactId>spring-boot-starter-web</artifactId>
</dependency>

<dependency>
  <groupId>org.springframework.cloud</groupId>
  <artifactId>spring-cloud-gcp-starter-pubsub</artifactId>
</dependency>

<dependency>
  <groupId>org.springframework.boot</groupId>
  <artifactId>spring-boot-starter-integration</artifactId>
</dependency>
To be able to connect to GCP service account, it is necessary to provide some account information to the application. We will have to define this in the application.properties. Remember to keep service-account.json which we downloaded from google console, inside main/resources directory of your spring boot code.
server.port = 8081
spring.cloud.gcp.project-id=<your gcp project id>
spring.cloud.gcp.credentials.location=file:src/main/resources/service-account.json
server.port = 8081
spring.cloud.gcp.project-id=<your gcp project id>
spring.cloud.gcp.credentials.location=file:src/main/resources/service-account.json
server.port: This property used to run server at specified port.
spring.cloud.gcp.project-id: This property is used to tell GCP about your projectId which you have crated on google console.
spring.cloud.gcp.credentials.location: This property is necessary for accessing the GCP project and must refer to the JSON file we downloaded for our service account.
Now we will start writing our code for sender application.
The ServiceActivator listens to messages on the demoOutputChannel and publishes them to the Outbound Channel Adapter PubSubMessageHandler which will deliver the message to testTopic. The Messaging gateway PubsubOutboundGateway will allow messages to be published to the myOutputChannel.
@SpringBootApplication
public class GcpPubSubApplication {

   public static void main(String[] args) {
      SpringApplication.run(GcpPubSubApplication.class, args);
   }

   @Bean
   @ServiceActivator(inputChannel = "demoOutputChannel")
   public MessageHandler messageSender(PubSubTemplate pubsubTemplate) {
      return new PubSubMessageHandler(pubsubTemplate, "testTopic");
   }

   @MessagingGateway(defaultRequestChannel = "demoOutputChannel")
   public interface PubsubOutboundGateway {
      void sendToPubsub(String text);
   }
Now in order to send message to topic, we will create one rest controller. The controller will receive a parameter message and send its contents via the Messaging Gateway to the topic:
@RestController
public class PubSubMesageController {

    @Autowired
    private GcpPubSubApplication.PubsubOutboundGateway messagingGateway;

    @PostMapping("/publishMessage")
    public ResponseEntity<?> publishMessage(@RequestParam("message") String message) {
        messagingGateway.sendToPubsub(message);
        return new ResponseEntity<>(HttpStatus.OK);
    }
}
Once we run this application with $ mvn spring-boot:run application will start on 8081 port.
Now lets create receiver application:
5. CREATE Receiver APPLICATION
For creating the receiver application gcpPubSubReceiverDemo, we go to Spring Initialzr and select Java 11. We will add all dependencies which we added in sender application. All application properties will be same as sender application except server-port. Since we will be running both applications on same machine, server-port for receiver application will be 8082.
The application contains the Inbound Channel Adapter messageChannelAdapter which links the Subscription tesSubscription to the Spring Channel demoInputChannel. The ServiceActivator will simply log the received message to console.
@SpringBootApplication
public class GcpPubSubApplication {

   public static void main(String[] args) {
      SpringApplication.run(GcpPubSubApplication.class, args);
   }

   @Bean
   public PubSubInboundChannelAdapter messageChannelAdapter(@Qualifier("demoInputChannel") MessageChannel inputChannel, PubSubTemplate pubSubTemplate) {
      PubSubInboundChannelAdapter adapter = new PubSubInboundChannelAdapter(pubSubTemplate, "testSubscription");
      adapter.setOutputChannel(inputChannel);

      return adapter;
   }

   @Bean
   public MessageChannel demoInputChannel() {
      return new DirectChannel();
   }

   @ServiceActivator(inputChannel = demoInputChannel")
   public void messageReceiver(String message) {
      System.out.println("Message arrived --> " + message);
   }
}
6. Running applications
Our sender and receiver applications are ready now. Run both the application (Sender and Receiver) with:
mvn spring-boot:runSender application will be running on localhost:8081
Receiver application will be running on localhost:8082
Open a terminal window and call rest API to trigger sending message from sender app:
$ curl --data "message= Congratulations! GCP Messaging is Working" localhost:8081/publishMessageCheck the Receiver applications console, you will see the message arrived from sender application:
Message arrived --> Congratulations! GCP Messaging is Working 7. Summary
In this post, we learned how to use GCP’s Pub/Sub service with spring boot application. Pub/Sub service is really useful while communicating between two applications over a cloud. It is very efficient and has minimum delay in message exchange and it ensures delivery of the message.
