
Everyone uses social media these days. We share our thoughts, things we find interesting and new things we learned on these platforms. Because that’s what social media is for, Learn, share and grow together!!
We all know the power of social media. We can reach out to many people around the world within a short span of time through social media. Sales team can relate to it more quickly. They are always in a hunt for different ways to reach as many people as possible for our product. What would you say if I tell you that, the developers have the power to attract maximum social media traffic to our site?
Yes, you read it right. We developers can do it with a minimum amount of effort. All the shopping sites are already doing it. Let’s see how!
Let’s say your friend wants to buy new gadget. Your friend found few good options on Amazon & shared those with you.
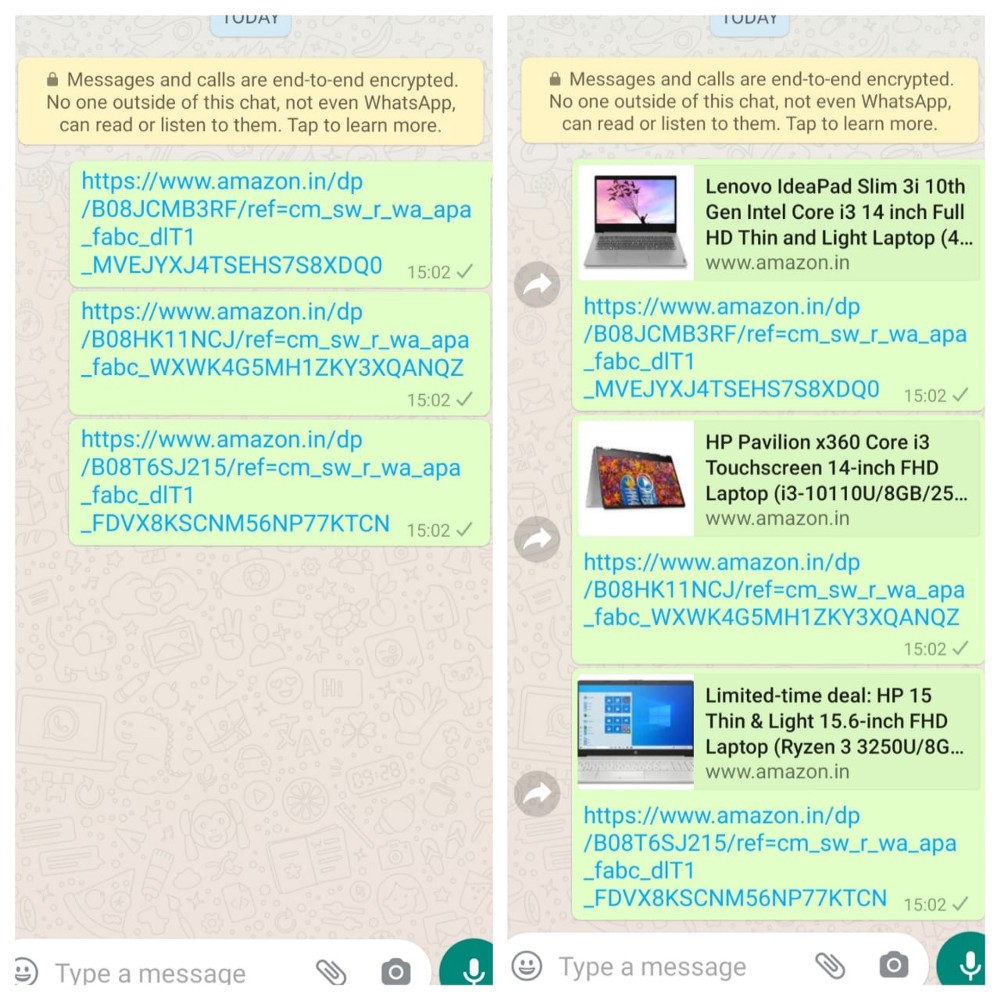
Now if your chat window looks like photo on left, then 90% of us will reply, “okay.. Will check later… I am a bit busy now” and done! You are never gonna visit those links.
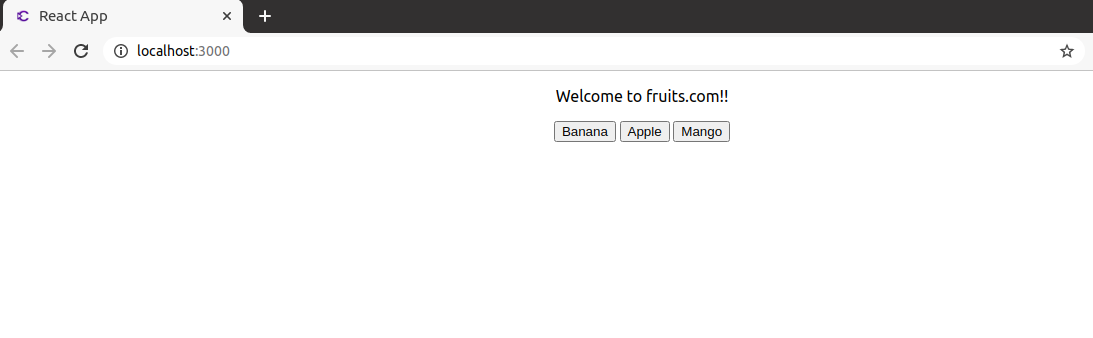
But that’s not what happens. Because our chat window looks like the picture on the right side. After seeing this we visit those links, we check that product, we check some other products, share those with our other friends and here the chain starts!!!
So these sites are getting n number of users by just making sites look better when shared on social media.
How do they do it?
Og meta tags come to the rescue here. So, let’s see how can we set dynamic og meta tags in react app.
If you are new to react or don’t know react at all. Don’t worry even if you have basic knowledge of html tags and how any app works you will get the concept.
What are meta tags?
Meta tags are nothing but a snippet of code that gives information about the page. There are different meta tags like title, description, keywords, author, viewport, open graph, robots, geo etc.
<meta name=”description” content=”Free Web tutorials”>
<meta name=”keywords” content=”HTML, CSS, JavaScript”>
<meta name=”author” content=”John Doe”>
<meta name=”viewport” content=”width=device-width, initial-scale=1.0">
For this blog we will focus only on open graph meta tags.
What are open graph meta tags?
So these are meta tags that control how urls will be shown on social media. Few examples of og meta tags are listed below.
<meta property=”og:title” content=”How to Set OG Metatgs” />
<meta property=”og:description” content=”Learn and try this amazing feature to get more social media traffic to your site” />
<meta property=”og:image” content=”https://encrypted-tbn0.gstatic.com/images?q=tbn:ANd9GcSaaQvHrCfrIAZvxzYqkisf5yPjpgyXHxgozQ&usqp=CAU"/>
Let’s see an example of how to use them in create react app(CRA).
I have added og meta tags in index.html
<!DOCTYPE html>
<html lang="en">
  <head>
    <meta charset="utf-8" />
    <meta name="viewport" content="width=device-width, initial-scale=1" />
    <meta name="theme-color" content="#000000" />
    <meta
      name="description"
      content="Web site created using create-react-app"
    />

    <title>React App</title>

    <meta property="og:title" content="Fruits" />
    <meta property="og:description" content="Read all about fruits here" />
    <meta
      property="og:image"
      content="https://www.eatforhealth.gov.au/sites/default/files/images/the_guidelines/fruit_selection_155265101_web.jpg"
    />
  </head>
  <body>
    <div id="root"></div>
  </body>
</html>
On show page, I have used react-document-meta to set meta tags. Made an API call to get the information of fruit and used that to set meta tags.
import React, { useEffect, useState } from "react";
import DocumentMeta from "react-document-meta";
import { useParams } from "react-router-dom";

const Show = () => {
  const [fruit, setFruit] = useState();
  const { id } = useParams();

  const meta = {
    meta: {
      property: {
        "og:title": fruit,
        "og:description": "This page is of" + fruit,
        "og:image":
          "https://www.eatforhealth.gov.au/sites/default/files/images/the_guidelines/fruit_selection_155265101_web.jpg",
      },
    },
  };

  useEffect(() => {
    fetch(`http://localhost:3001/api/fruits/${id}`, {
      method: "GET",
    })
      .then((response) => response.json())
      .then((response) => {
        setFruit(response.data);
      })
      .catch((error) => console.log(error));
  });

  return (
    <div>
      <DocumentMeta {...meta}>
        <p>Show page of: "{fruit && fruit}" </p>
      </DocumentMeta>
    </div>
  );
};

export default Show;
On home page, I have given options to get info about that fruit
import React from "react";
import { useHistory } from "react-router-dom";

const Demo = () => {
  const history = useHistory();

  return (
    <div>
      <p>Welcome to fruits.com!!</p>
      <>
        {" "}
        <button onClick={() => history.push("/fruits/1")}>Banana</button>{" "}
      </>
      <>
        {" "}
        <button onClick={() => history.push("/fruits/2")}>Apple</button>{" "}
      </>
      <>
        {" "}
        <button onClick={() => history.push("/fruits/3")}>Mango</button>
      </>
    </div>
  );
};

export default Demo;
And finally App.js looks like this
import { BrowserRouter, Switch, Route } from "react-router-dom";
import Show from "./show";
import Demo from "./demo";
import "./App.css";

function App() {
  return (
    <main className="App">
      <BrowserRouter>
        <Switch>
          <Route exact path="/" component={Demo} />
          <Route path="/fruits/:id" component={Show} />
        </Switch>
      </BrowserRouter>
    </main>
  );
}

export default App;
Now just start server and check if It is working.

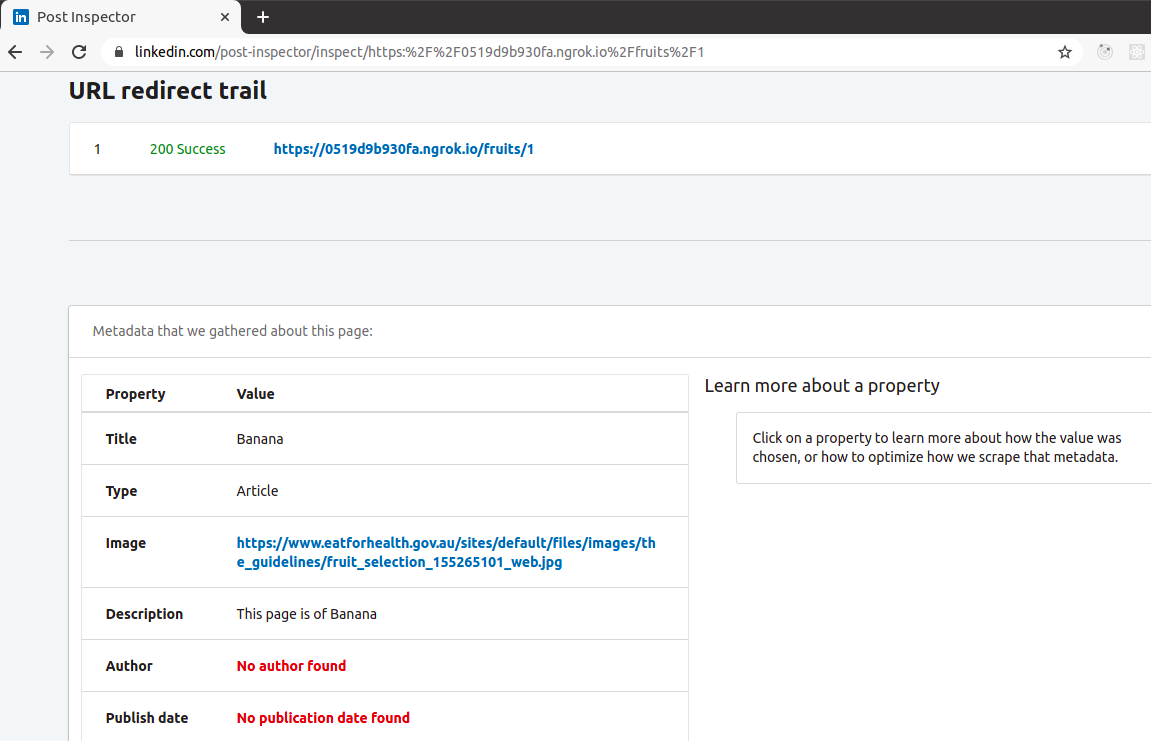
Now, let’s test how site looks by sharing on LinkedIn.
LinkedIn has post inspector to test how your site will look when shared on LinkedIn. (It needs only secure urls for that I am using ngrok. Check https://ngrok.com/ for more information )
- Visit https://www.linkedin.com/post-inspector/
- Paste url of app and inspect
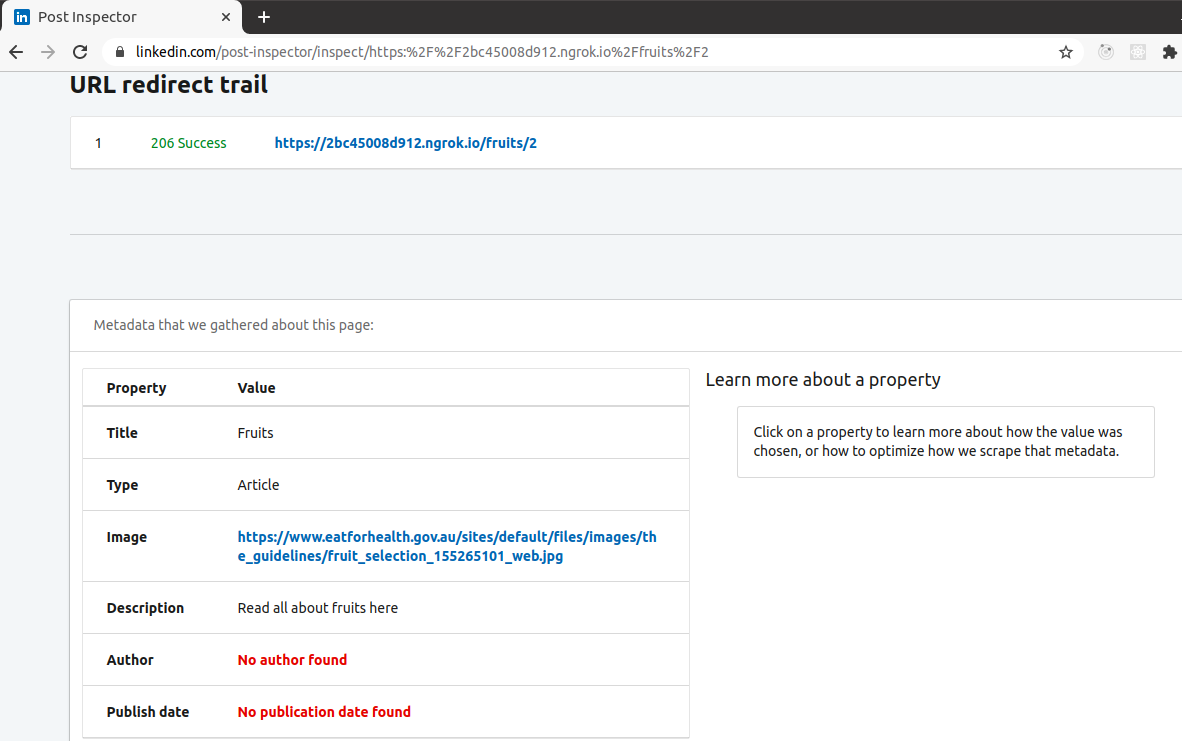
If you check the title in both the images is same. But as per expected results titles should be “Banana” and “Apple” respectively. To check which meta tags are applied, right click on page and select “View Page Source” option.
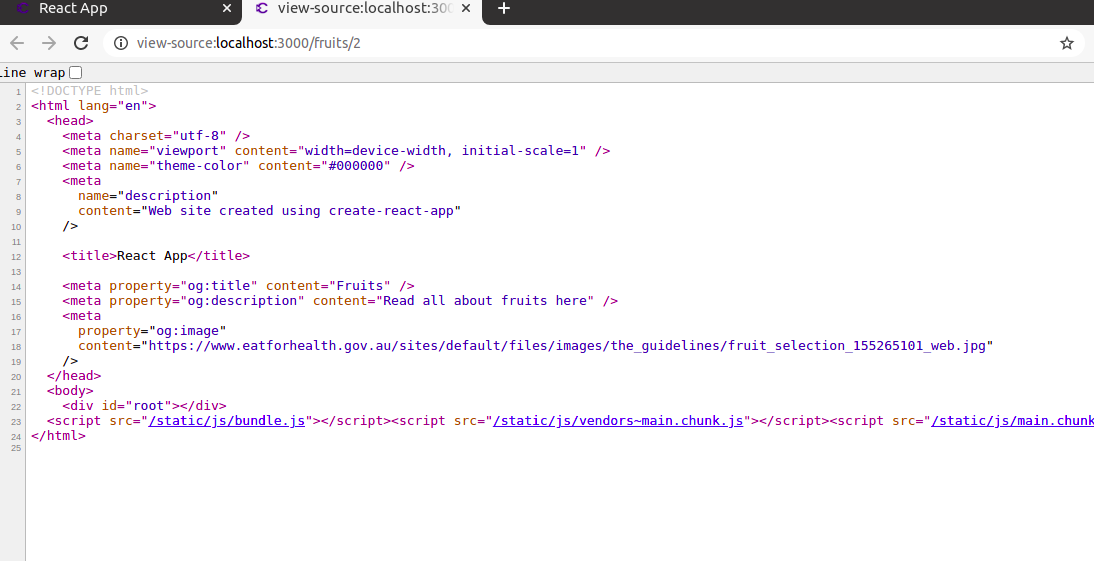
Why?
The answer is Client Side Rendering.
Client Side Rendering (CSR)
In CSR all the page resources are rendered on client side instead of server side. First, the html file is rendered then javascript is executed and then api call is initiated and response is set.
So in our case what happened is meta tags got set when index.html was rendered till then we didn’t have response from our API call. So only static meta tags got set.
So solution to this is to use server side rendering
Server Side Rendering (SSR)
Here all the processing is done on the server side and finally, the rendered html file is sent to the browser. So before generating html we get response for our API call and meta tags are set as per response.
To read more about CSR and SSR visit https://medium.com/@adamzerner/client-side-rendering-vs-server-side-rendering-a32d2cf3bfcc
Create React App doesn’t support Server Side Rendering. To use this feature we need to shift to NextJs App. NextJs App supports both Client Side Rendering and Server Side Rendering. To know more visit https://nextjs.org/
To make page Server Side Rendered we have to use method called getIntialProps().
What we are gonna do is, First fetch data by making an API call and send that data to component and set tags. So when page render we already have data to set to og tags.
Let’s see an example of NextJs App.
Created a file pages/[id].js
import React from 'react';
import axios from 'axios';
import Head from 'next/head';


const Show = ({ fruit }) => {

  return (
    <>
    <Head>
      {/* General tags */}
      <title key="title">{fruit}</title>
      {/* OpenGraph tags */}
      <meta key="og:title" name="og:title" content={fruit} />
      <meta
        key="og:description"
        property="og:description"
        content={"This page is of " + fruit}
      />
      <meta
        key="og:image"
        property="og:image"
        content="https://www.eatforhealth.gov.au/sites/default/files/images/the_guidelines/fruit_selection_155265101_web.jpg"
      />
      <meta property="og:image:width" content="340" />
      <meta property="og:image:height" content="340" />
      {/* Twitter Card tags */}
      <meta key="twitter:card" name="twitter:card" content="summary" />
      {/* FaceBook App Id */}
      <meta property="fb:app_id" content= {process.env.FB_APP_ID} />
    </Head>
    <> This Page is Show Page</>
    </>
  );
};

Show.getInitialProps = async function ({ query }) {
  const searchUrl = `http://localhost:3001/api/fruits/` + query.id;
  const response = await axios.get(searchUrl);

  return { fruit: response.data.data };
};

export default Show;
Visit LinkedIn Post Inspector.
Similar to LinkedIn, Twitter has card validator to check how your site looks after sharing. Visit https://cards-dev.twitter.com/validator

You can also use Facebook debugger for testing on Facebook. You can check page source code and search for og meta tags.
Summary:
In this blog, we mostly highlighted the ways to attract traffic to your site, and for that which codes are a must. Please write to us for further queries.
Thank You!! Happy Coding!!

I found it really interesting and helpful. I feel that I just need to try it. Thanks!