

In this blog, we are going to learn:-
→ Basic installation of Jenkins
→ Configuring Jenkins with your project’s GitHub
→ Running the build locally on a defined time with the use of Cron jobs.
→ Covers workarounds that a user can face while installing Jenkins.
Why Cypress
Modern web applications are built on JavaScript libraries, which have great user interface for end users but it’s a bit complex when it comes to testing. Hence Cypress mainly addresses the key pain points which developers and QA engineers have to face while testing the application which helps in End to End UI automation testing.
Let’s delve a little deeper and talk about Jenkins:-
Why Jenkins
Jenkins is an open-source continuous integration/continuous delivery and deployment (CI/CD) automation software DevOps tool written in the Java programming language. It is used to implement CI/CD workflows, called pipelines.
How Jenkins helps with Cypress Automation
Jenkins is an open-source CI server, which helps get Test scripts/testing automated. CI (Continuous Integration) is a process that enables you to integrate code changes from multiple developers working on a single project quickly and repeatedly. When a developer commits code, it can immediately be tested. If all the tests pass, the code can be integrated into the build, which can similarly be tested and immediately verified.
Automated tests are typically used alongside automated builds so that the process can be fast, effective and easily repeatable.
Cypress Integration with Jenkins Server-
Installation
Step 1:
Install Java 11 or above version.
java - version
Command 'java' not found, but can be installed with:
sudo apt install default-jdk
sudo apt install default-jre
Installation of java in your local system is necessary because Jenkins is a java based application that runs under a container like tomcat. Hence, you can not run jar/war packaged binary without having java.
Step 2:
After successful installation, let’s download the war file
Download Jenkins Generic Java package (.war)
Copy the jenkins.war file to the folder you want.
Open the command prompt window and browse to the directory where the jenkins.war file is present, through the command cd C:\Program Files (x86)\Jenkins.
Step 3:
Install Jenkins in our local setup.
In order to install Jenkins locally, we will add this Debian package repository of Jenkins, and to use this repository we will add the key to our system:
wget -q -O — https://pkg.jenkins.io/debian-stable/jenkins.io.key | sudo apt-key add -
Sometimes, it is observed that the above command returns “no valid OpenPGP data found”. This problem might occur if you are behind a corporate proxy and the corporation uses its own certificate. Just add “ — no-check-certificate” in the command. E.g.
wget — no-check-certificate -qO — http://pkg.jenkins-ci.org/debian/jenkins-ci.org.key | sudo apt-key add -
When the key is added the system will return OK. Therefore, append the debiandebin package repository address to the server’s source:list
sudo sh -c ‘echo deb http://pkg.jenkins.io/debian-stable binary//etc/apt/sources.list.d/jenkins.list’
At the end we will update our local package index, then finally we will install Jenkins:
sudo apt-get update
sudo apt-get install jenkins
After successfully installing Jenkins, this is how we can login to Jenkins server via our local host-
- Open up a terminal in the download directory
- Run java -jar jenkins.war — httpPort=8080
- Browse to http://localhost:8080
For me, port 8080 was already occupied, hence I picked another port:

When we run the Jenkins server for the first time, we will get a password generated by Jenkins. Write down the random password that is auto generated. We will use this password for the initial login later.
Verifying the status of Jenkins server-
Jenkins by default starts running when installed, however you can use following command to confirm the status
of server:
sudo systemctl status jenkins
The command should return the status Active (running) when Jenkins is running:

Or, inactive (dead) when stopped:

Similarly, you can use the following command to start, stop and restart the server:
sudo systemctl start jenkins
sudo systemctl stop jenkins
sudo systemctl restart jenkins
Let’s create our first Jenkins Pipeline:
Step 1:
After successful installation of Jenkins let’s navigate and start creating automated test cases with our local setup.
Navigate to your browser and enter http://localhost:8080/ as URL. While accessing Jenkins for the first time with your browser, an Admin login password is required-
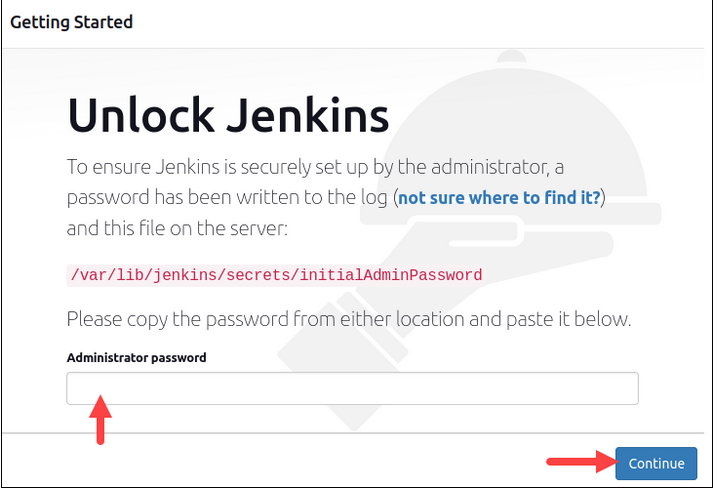
Obtain the default Jenkins unlock password by opening the terminal and running the following command:
sudo cat /var/lib/jenkins/secrets/initialAdminPassword
The system returns an alphanumeric code. Enter that code in the Administrator password field and click Continue.
Once the login process is completed, we will be able to see the Jenkins dashboard.

Step 2:
Click on “+ New Item” on creating a new project/pipeline. Add a project name/pipeline name and select “Freestyle project”/”Pipeline” and lastly, click Ok button to create all new project.

Step 3:
After successful project creation, users should be navigated to a general setup about the project. Users can add project description:

After that, click on “Source Code Management ” and add the git repository Url of your project.
Note :
Sometimes it is observed that under source code management, only “None” is available. Hence you need not install a GitHub plugin, which will allow you to pull code from a GitHub repository.
- From the dashboard, click on the Manage Jenkins button on your Jenkins dashboard.
- Find plugins option.Click on Manage Plugins.
- Select the GIT Plugin
- Click on Download now and Install after restart. The plugin will take a few moments to finish downloading depending on your internet connection, and will be installed automatically.
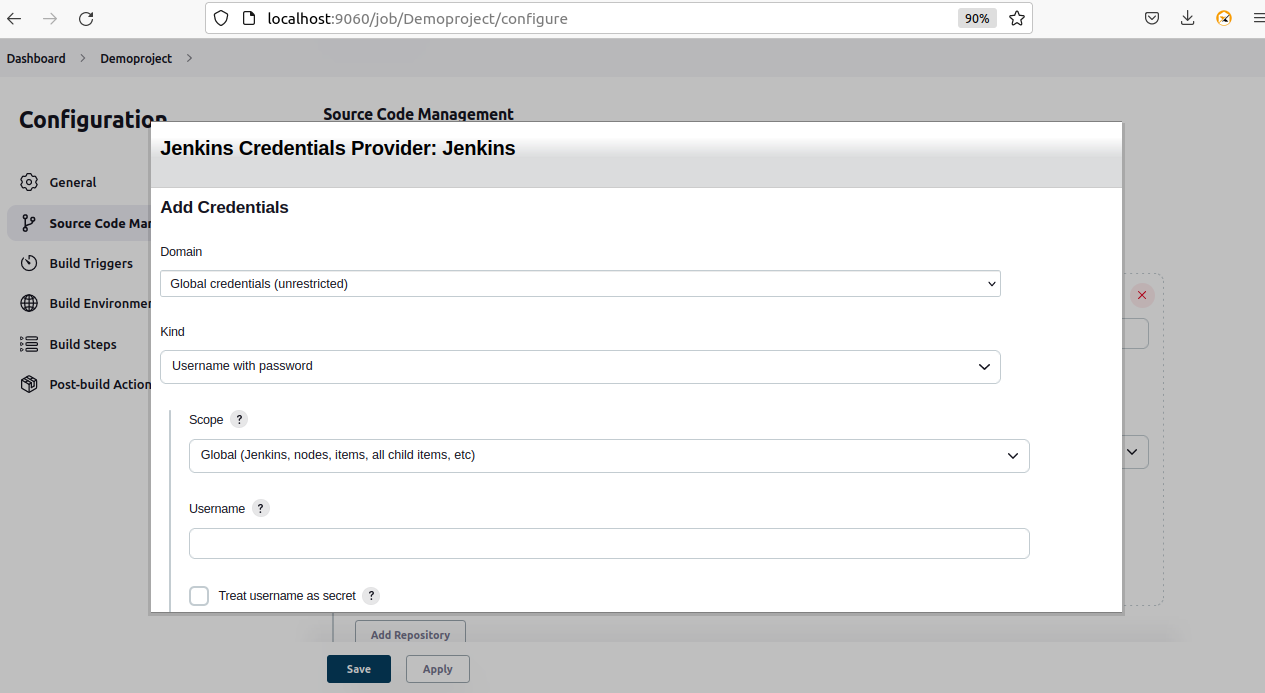
If your project’s repository is private, you need to add credentials for Jenkins to access the git repository and finally click on add.
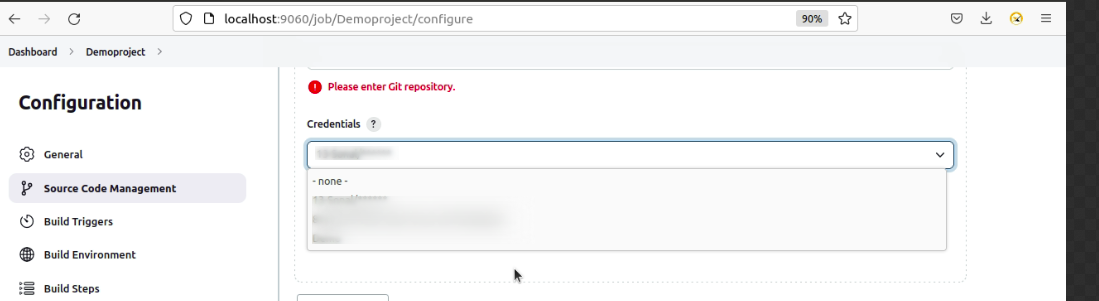
After adding, respective credentials should be visible under the credentials drop down:
Once the credentials are added, move ahead with “Build Steps” for adding execution steps. Select “Execute Shell” option from build steps dropdown and enter following steps:
- npm install
- npm run demosanitycases (name of folder which you want to run)

(Optional Step) In order to get updates on test case execution, you can add E-mail Notification under Post-build Actions and click on Save. Adding E-mail under after build will forward the report of execution via Emails.
Step 4: Lastly, click on “Build Now” to execute the build.

Step 5: In addition, for monitoring the execution in real-time user can check Console Output :

Once the basic setup is completed, let’s move ahead with a bit advanced step.
Run the build at scheduled time everyday:
Step 1: Navigate to the project’s configuration and click on Build Trigger.
Step 2: Select Build Periodically option
Build Periodically accepts time format in form on cron job. The format followed by cron job is :

Thank you for reading my blog, do provide your valuable feedback in the comments. If you enjoyed this article, Keep Sharing!!! 👐

Nice